Full version
This version has all features, and will be a long-term maintained version.
Quantity:
Free viewer
This version can render or view the effects created with the Full version. It cannot modify any parameter or setting.
Quantity:
Free viewer:
4 well-made human hair presets for free! Only Blender 3.1 or above is supported.
Download 3D Hair Brush Free Viewer and get free hairstyles! Load with one click, it’s so easy to use.
This add-on is just a viewer of 3D Hair Brush, if you want more hairstyles and more features, please purchase the full version to unlock all features.
📢Update log:
Version: 3D Hair Brush 4.7.3
Updated on Mar 28, 2026
New Features:
Support Blender 5.0 & 5.1
The Weight brush now supports X-mirror.
The brush option menu is a pop-up menu now, which can be clicked multiple times in the panel.
For new hair system, the density mask of interpolated children hair also works for the parent hair.
Fix the issue that the view is not updated when adding or removing particle hair modifiers in EEVEE material preview mode.
Fix the issue that the hair cannot be hidden in particle hair edit mode when the Weight brush is selected.
Fix the issue that the particle Weight brush will exceed the border when smoothing weights.
Fix the crash caused by removing geometry nodes.
Updated on 2025-08-02
New Features
▪️Support Blender 4.5
▪️3D brushes for the curve hair system now support Distance under Collisions added in Blender 4.4.
Fixes
▪️Fix the issue that the option Random Color is not copied when the texture area of hair cards is copied.
▪️Fix some errors that occur when removing particle hair modifiers.
Updated on 2025-04-02
New Features
Support Blender 4.4
▪️Add a new function "Snap to Surface" to the list of Hair Menu in Hair Manager panel.
▪️Fixes
▪️Fix the issue that the position of the pinned point is moved when the hair curves are simulated.
▪️Fix the pie menu where the radius and strength of the curve brush can not be modified occasionally.
▪️Fix the issue that the brush icon won't be displayed when switching to Selection Paint brush in the pie menu of the curve brush.
▪️Fix the issue that the hair is not updated in real time when the texture options are modified and the procedural texture is used in a hair particle modifier.
▪️Fix the effects of the modifier when copying the hair particle modifier.
▪️Fix the issue that the children are not displayed in edit mode for hair particles in Material Preview mode for Cycles Hair engine.
▪️Fix the issue that the hidden instance objects of the original objects are not displayed in Material Preview mode for Cycles Hair engine.
▪️Fix the error which occurs when the textures are not combined when the hair cards are applied.
▪️ix the direction of Specular for hair cards.
Full version
Introduction
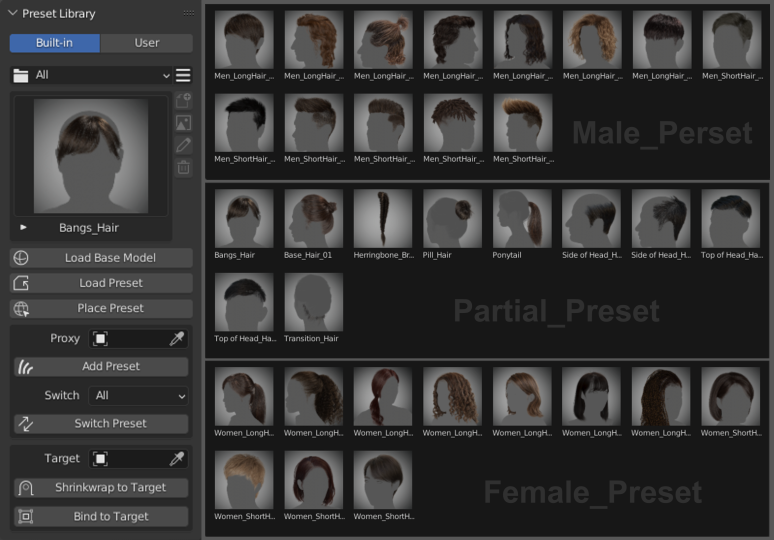
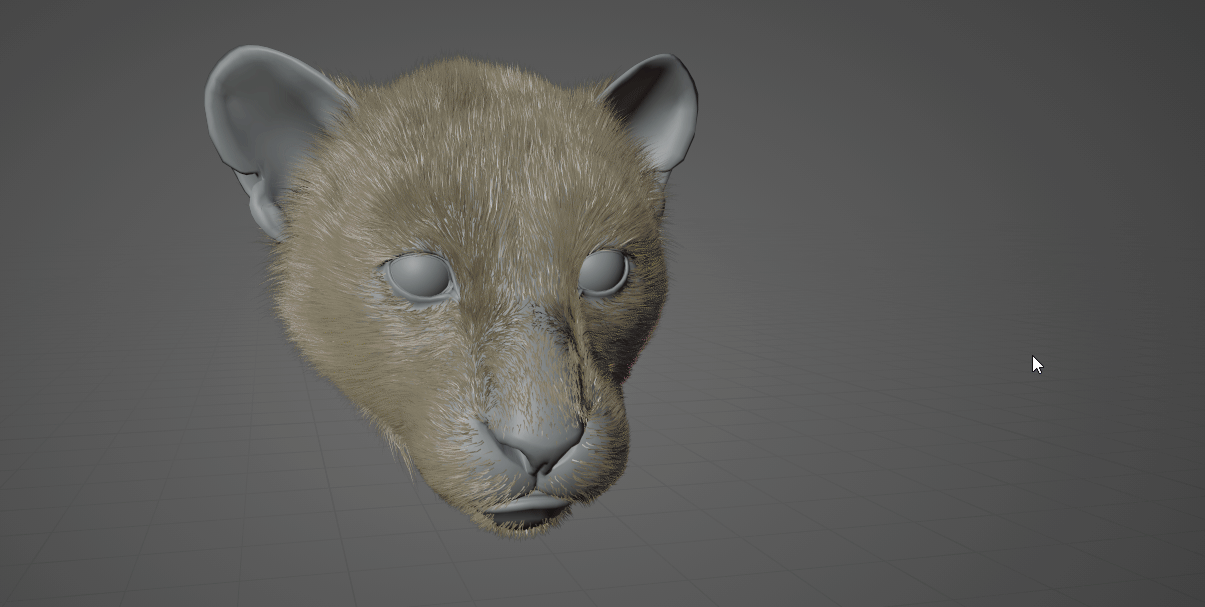
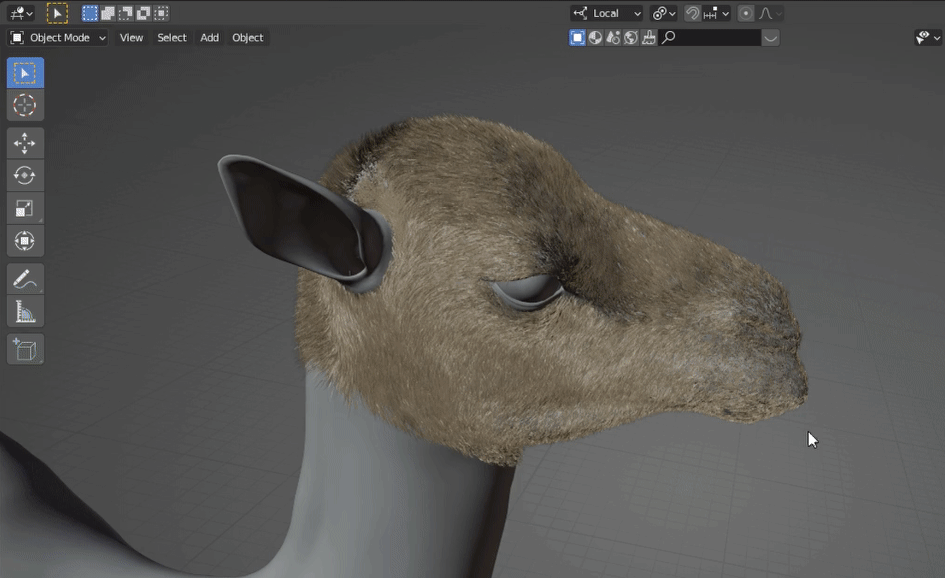
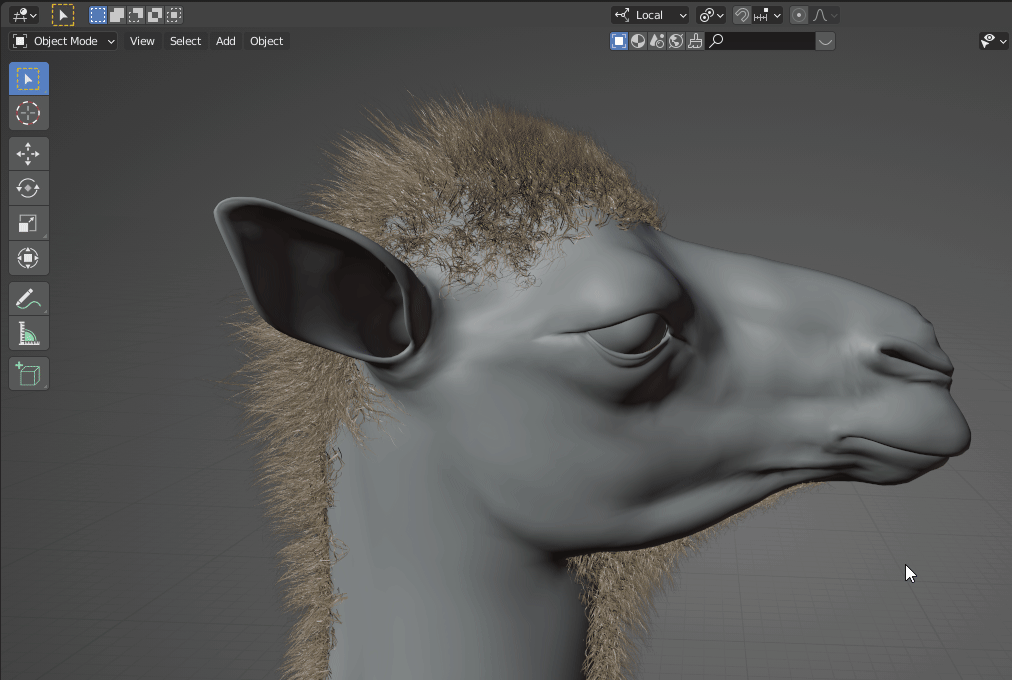
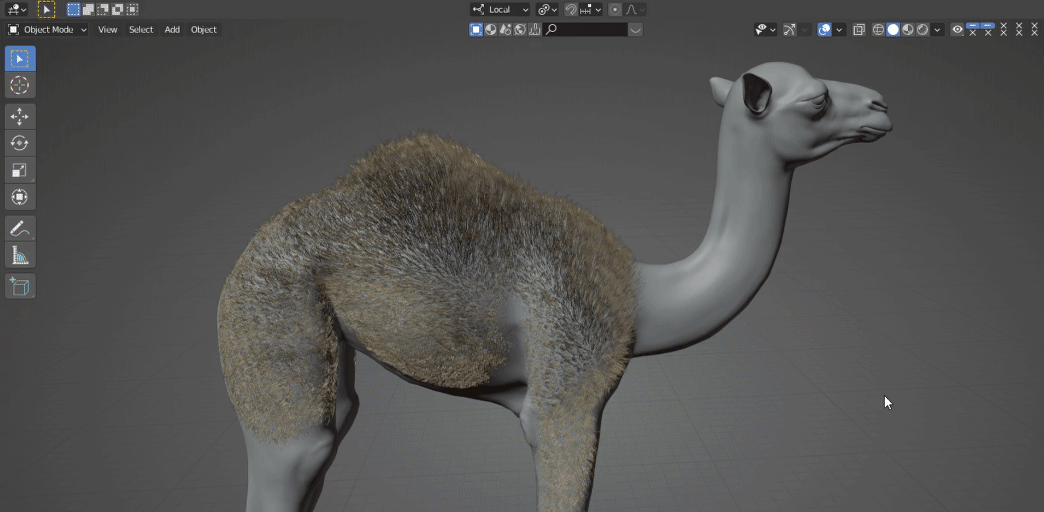
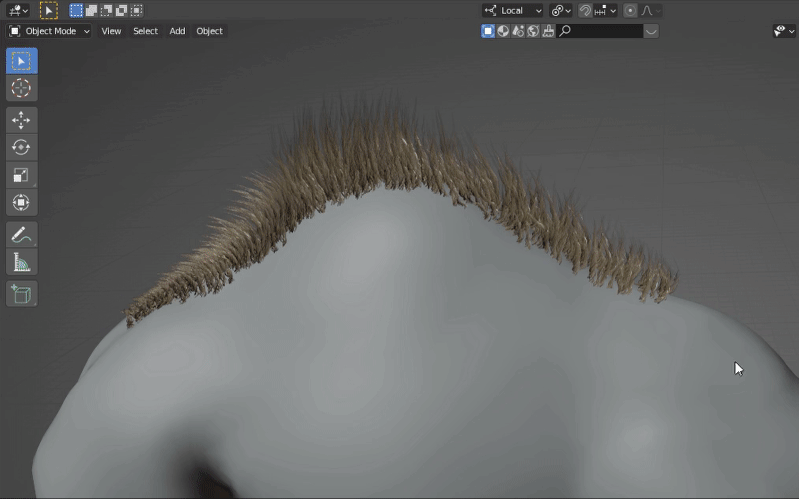
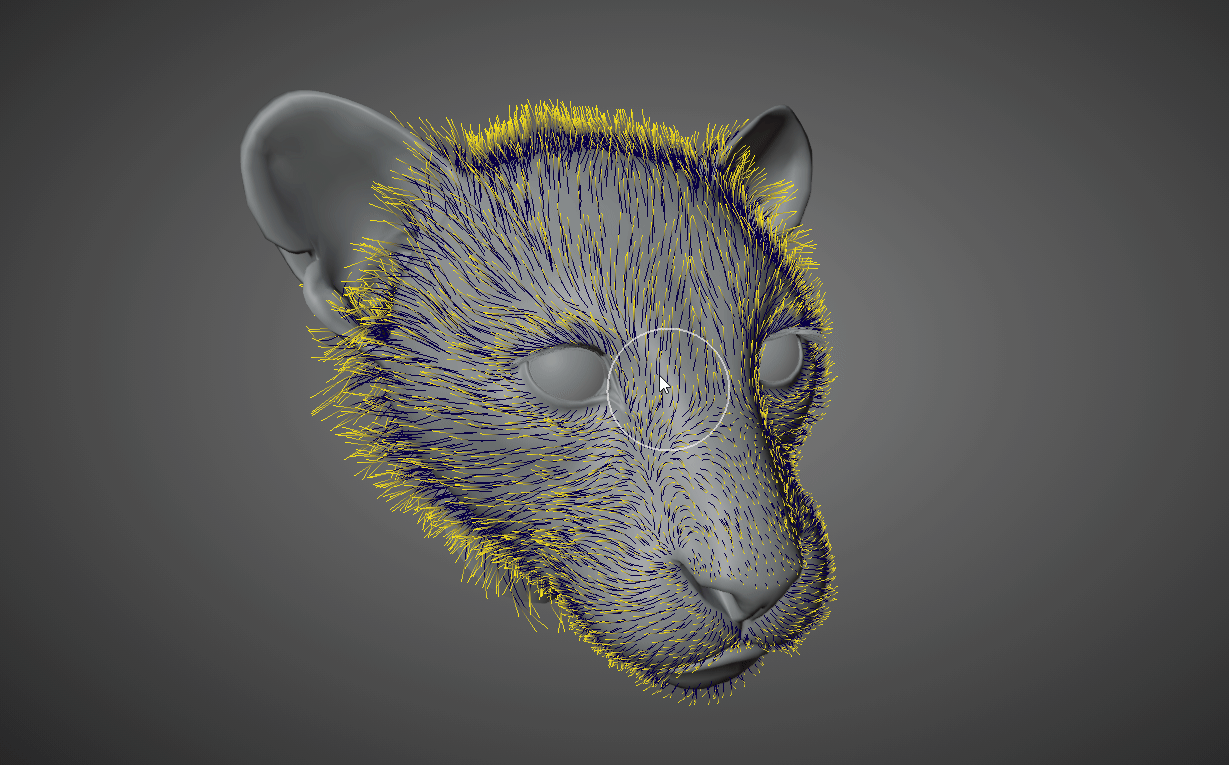
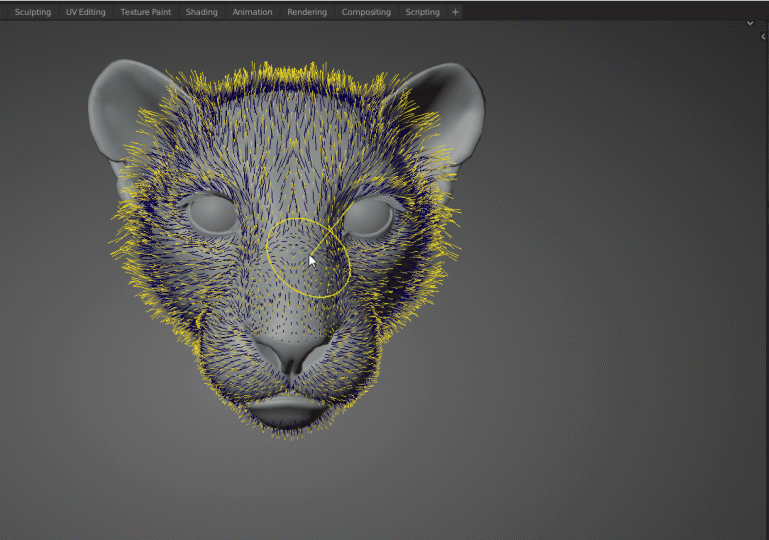
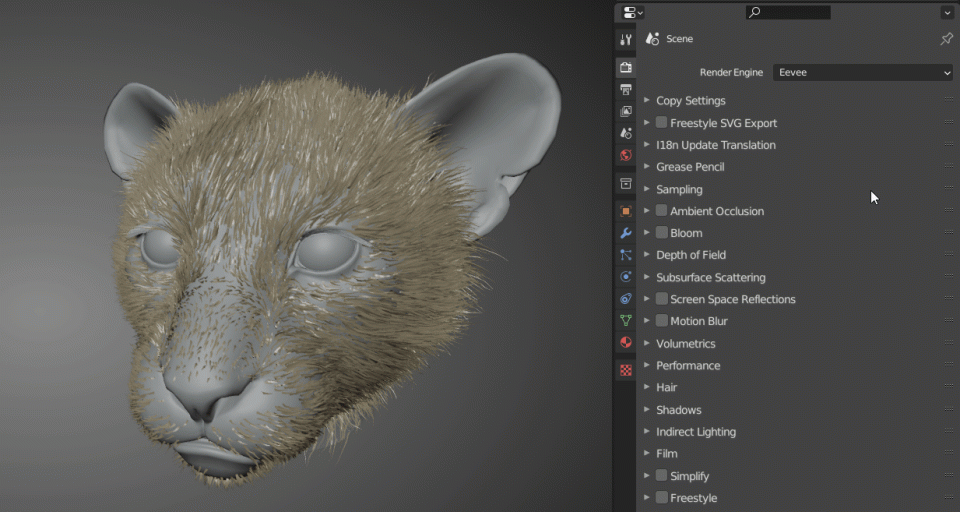
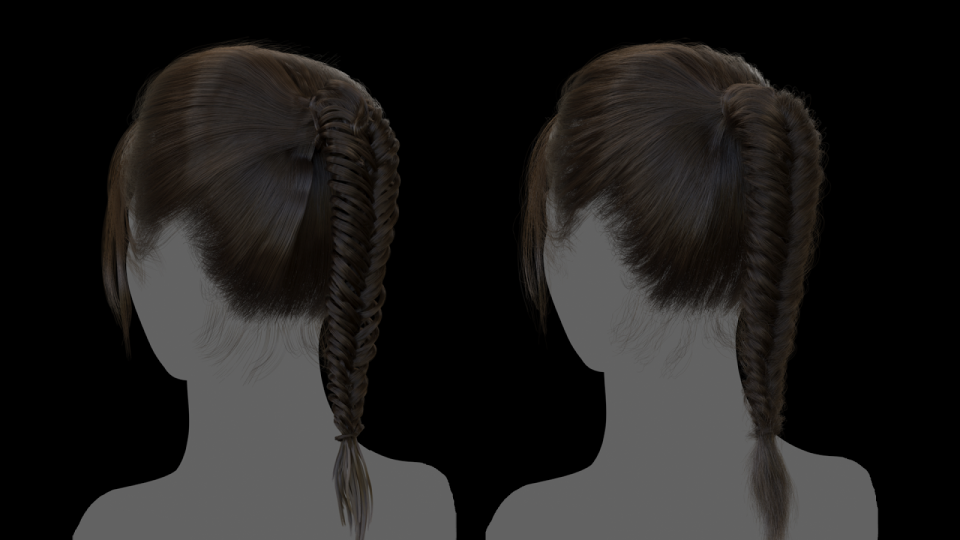
3D Hair Brush is a powerful hair grooming tool that fully supports the new hair system, allowing users to easily achieve stunning hairstyles and animal fur effects. The addon offers a variety of hair brushes, children modifiers, preset libraries, CyclesHair Render, and efficient hair grooming tools. With its user-friendly interface and diverse functionalities, even beginners can easily use this tool. Using this addon can enhance the efficiency of hair grooming and styling adjustments in Blender, while achieving a professional level of quality. 3D Hair Brush is undoubtedly the productivity tool for 3D artists.
Features
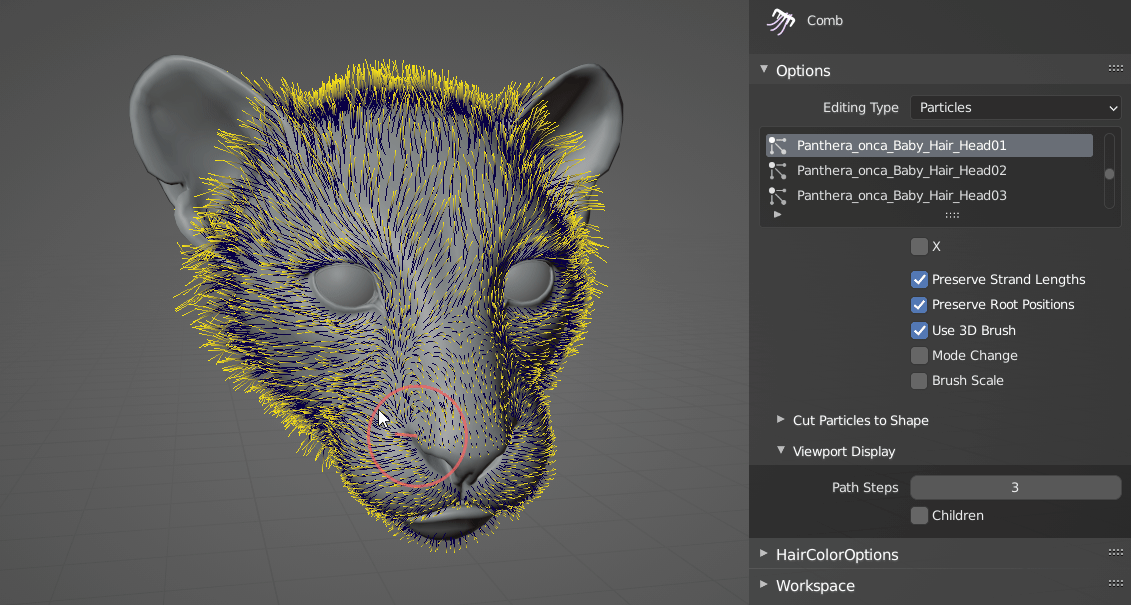
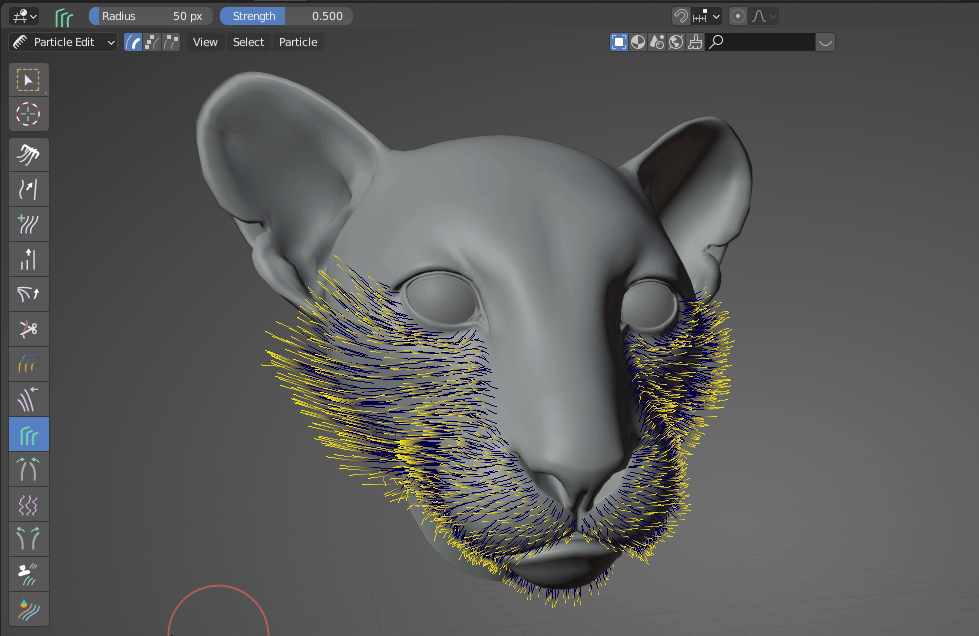
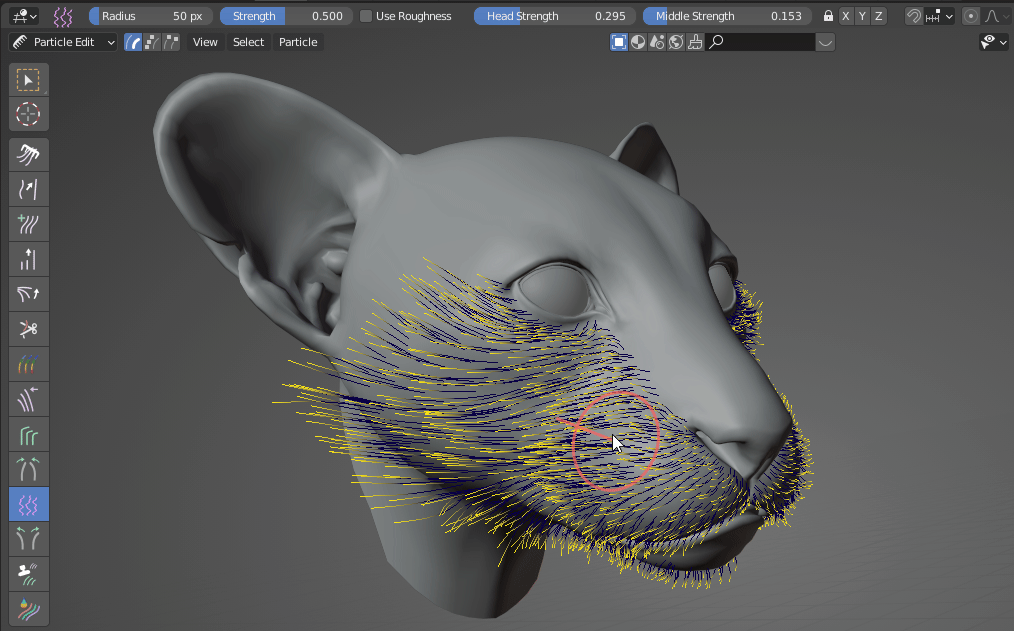
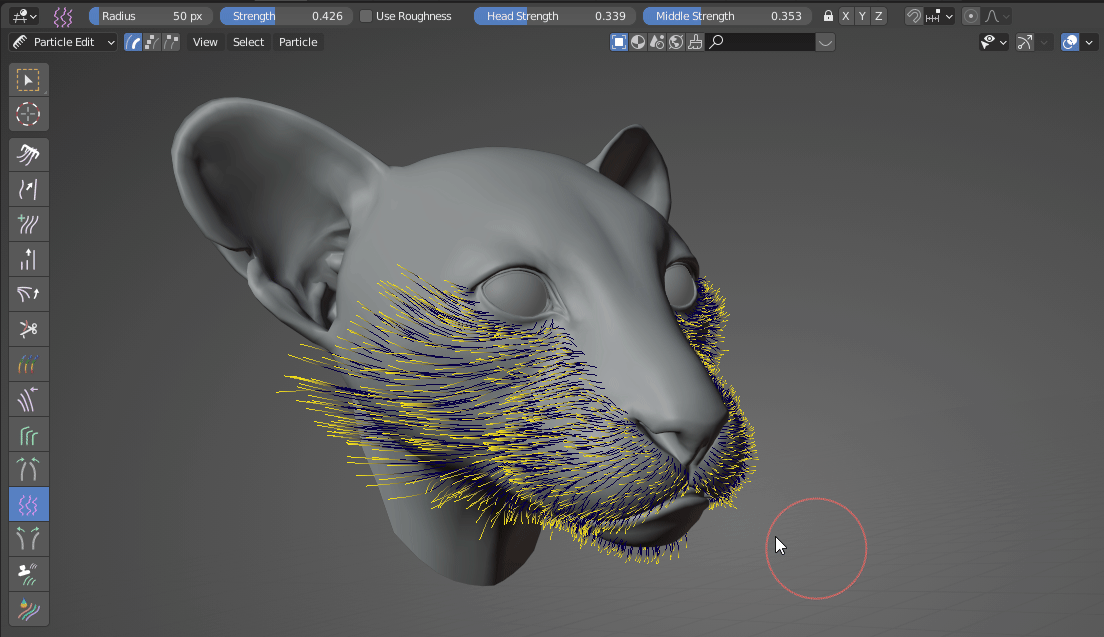
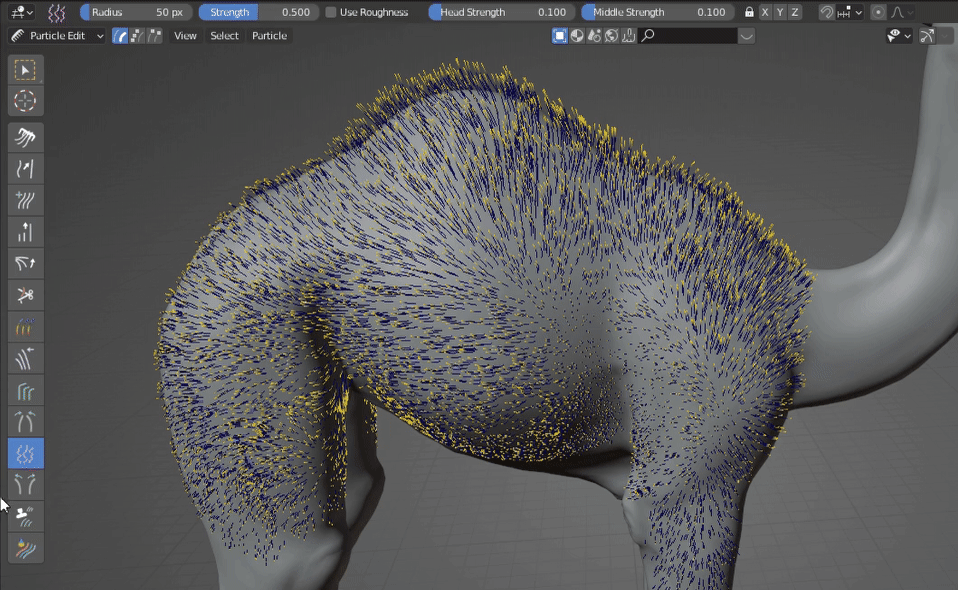
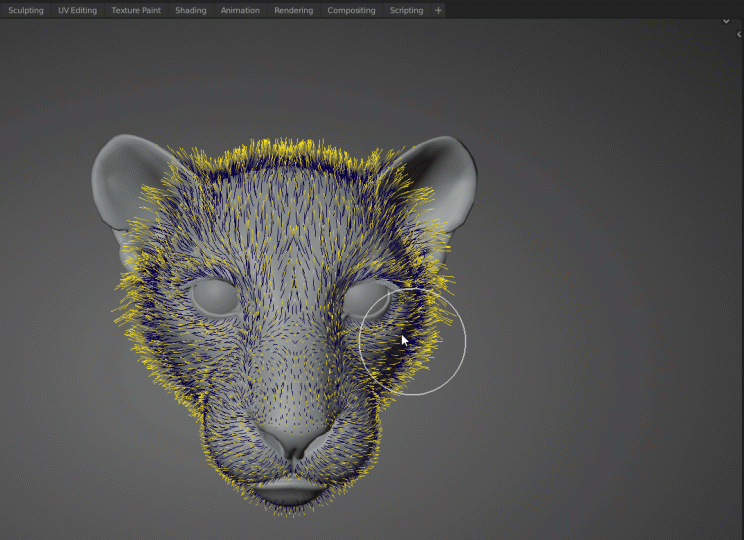
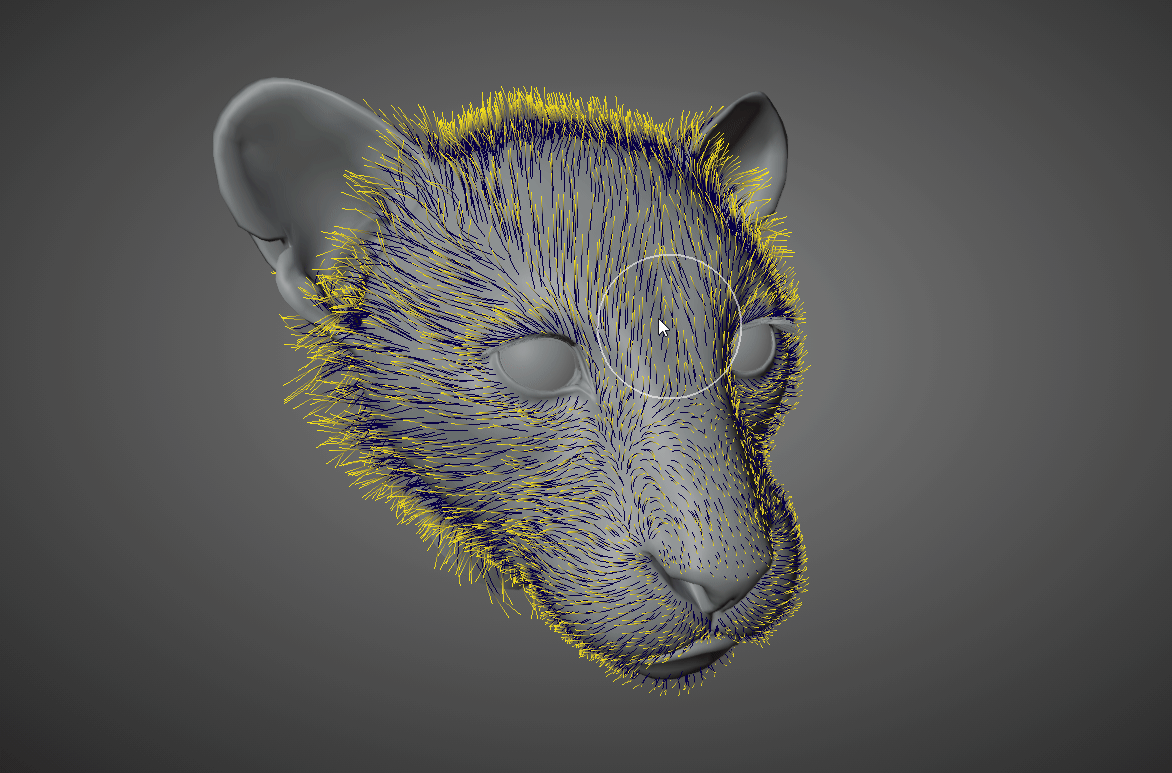
1. 3D Brushes
Get rid of traditional 2D brushes and bring users brand-new 3D brushes that perfectly support the new hair system. Multiple new hair brushes are provided for both the old and new hair systems, making hair grooming more efficient.

New hair system brush tutorial
Old hair particle system brush tutorial
3D Hair Brush Demo Reel
Tutorial
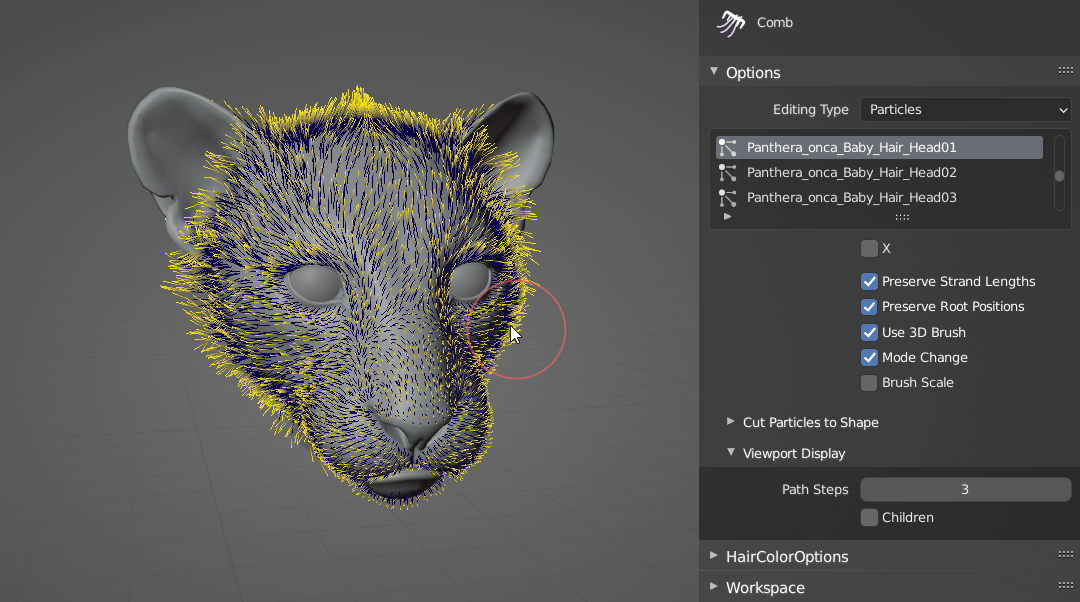
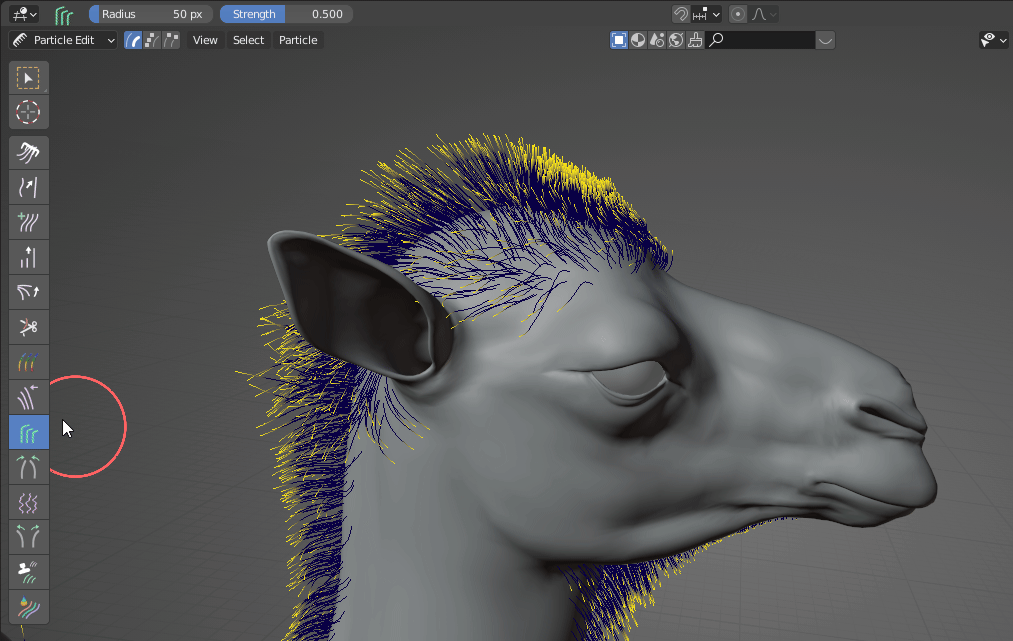
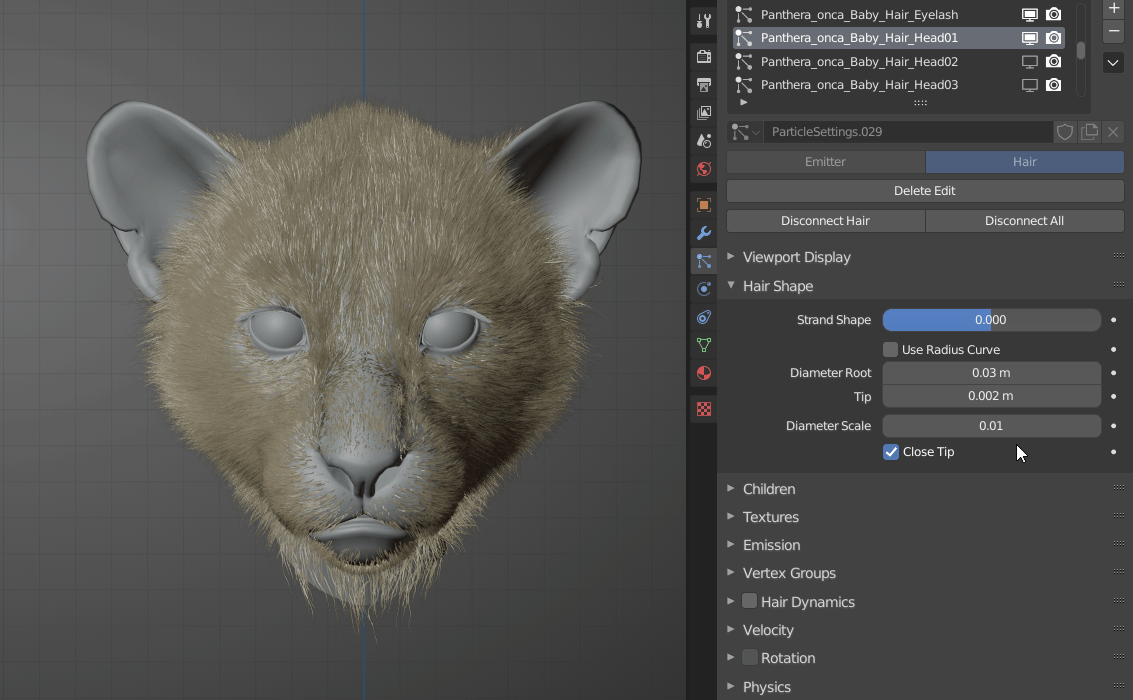
3D Hair Brush is a powerful hair tool, including 3D brushes with Pie Menu, Use Radius Curve, Use Diameter Random, and Hair Modifier.
3D brushes can distinguish complex muscle surfaces of models and provide artists with a wonderful experience of grooming hairstyles in Blender; With multiple well-designed brushes presets, it gives efficient solutions to making varying hairstyles;
Using Radius Curve makes it convenient for us to control hair shape;
Using Diameter Random makes it possible to randomize the thickness of hair in just one particle system.
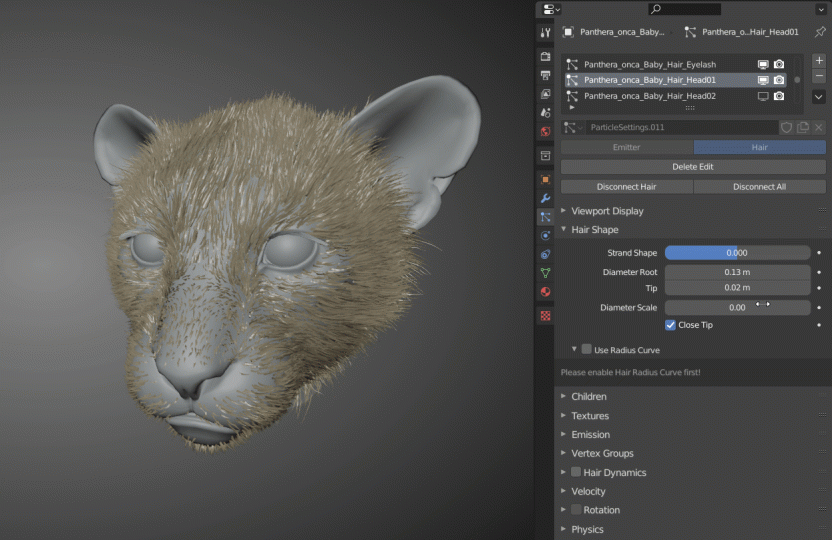
Modifier gives us an opportunity to add modifiers layer by layer until we get a good result and it doesn't destroy any hair shape we created before.
Running Environment
Windows 10: Blender 2.93, 3.0, 3.1, 3.2, 3.3, 3.4, 3.5, 3.6……5.1
Mac os 10.15: Blender 2.93, 3.0, 3.1, 3.2, 3.3, 3.4, 3.5, 3.6……5.1
Ubunto 18.04&20.04: Blender 2.93, 3.0, 3.1, 3.2, 3.3, 3.3, 3.4, 3.5, 3.6,4.0……5.1
Installation
Click Edit -> Preferences -> Add-ons -> Install, select the Zip file, and hit Install Add-on.
Uninstallation
- Disable this add-on.
- Save Preference settings, which is done automatically by default.
- Restart Blender, and then remove this add-on.
Features
BRUSH
- Options
- Enable 3D Brush
When a guide’s second point from the root is in the brush area, 3D brushes can work normally.
- Auto Switch: When enabled, the brush is toggled between 3D mode and 2D mode when it’s on or off the geometry. When disabled, there is no brush when it’s off the geometry.
- Brush Scale: When enabled, the brush can keep its scale in 3D space. When disabled, the brush can keep its scale in 2D space.
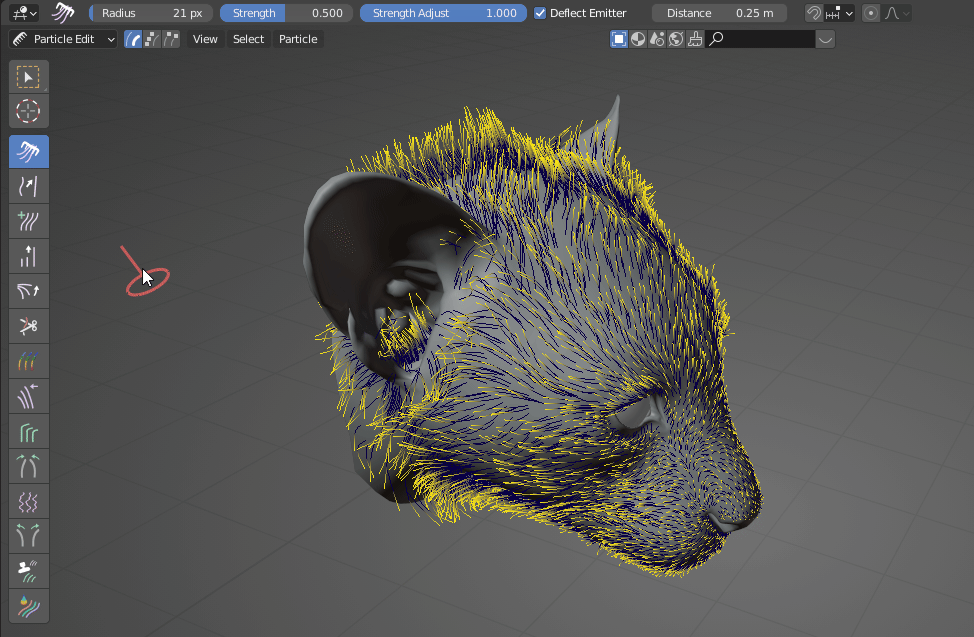
- Comb brush
When Preserve Root Length is unchecked, guides can be moved along the surface of geometries. If you want to move the guides away from the surface, you can select the default Comb brush.
- Smooth Brush
- Length: Smooth the guides to make them average in length.
- Add Brush
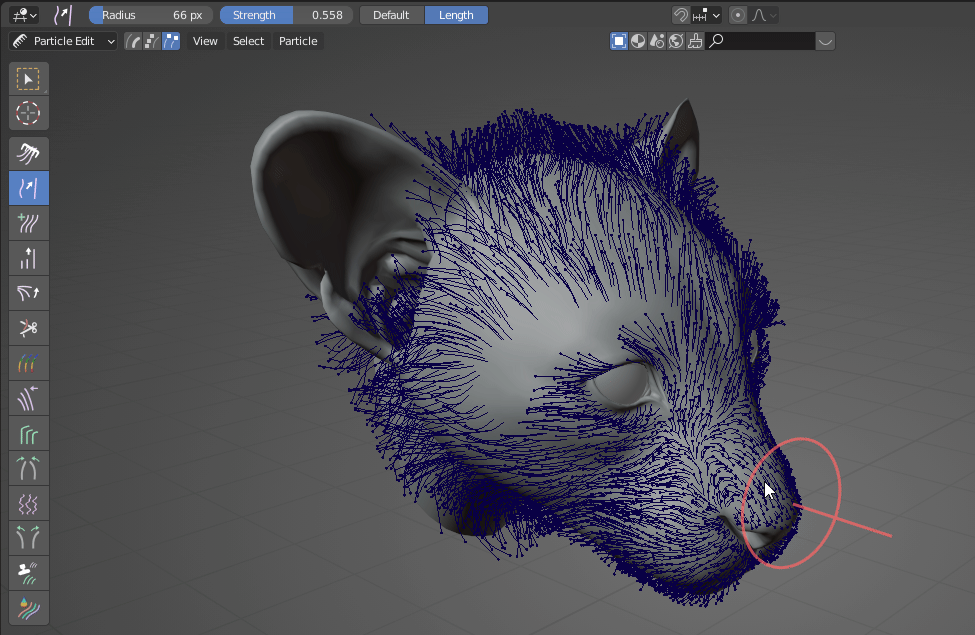
- Length Brush
-
- Target Length: It’s the limit when the guides are lengthened or shortened.
-
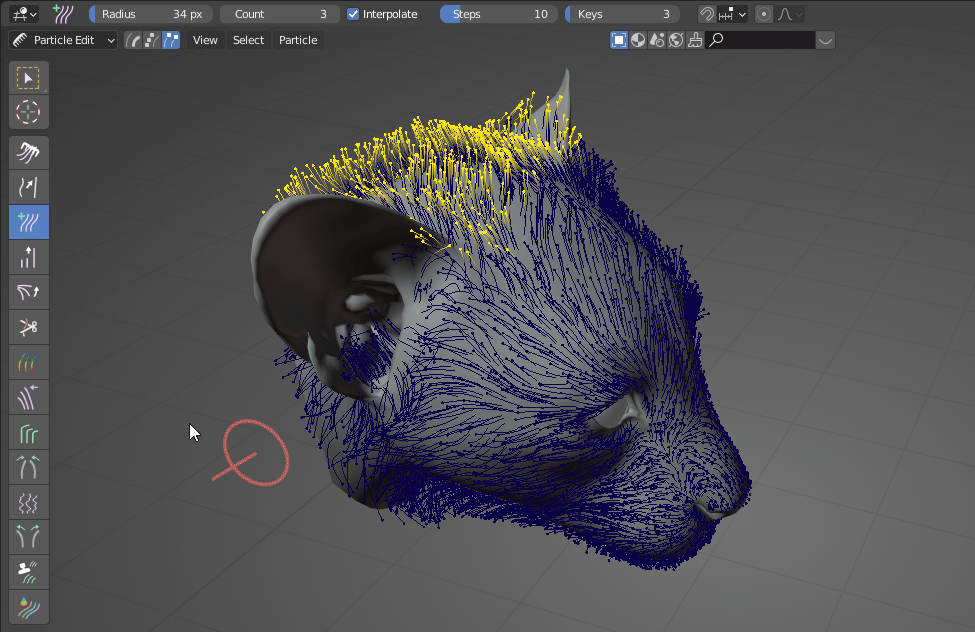
- 3D Puff Brush

- Weight Brush
-
- Increase, Decrease, Smooth: Modify weight smoothly
- Strength: The strength of the weight brush.
-

- Orient Brush
-
- Orient, Sunder, Repel:
- Orient brush only changes the orientation of the guides while keeping the original shapes. With the Curve enabled, the guides will be bent slightly.
-
- Bend Brush
- Bending guides.
- Attract Brush
- Creating clamps.
- Noise Brush
Use Roughness: It works the same as the Roughness in the Children.
Axes Locking: Disable the noise on one or more axes as per the locked axes.
- Part Brush
It only modifies the orientation of the guides, keeping the shapes of the guides.
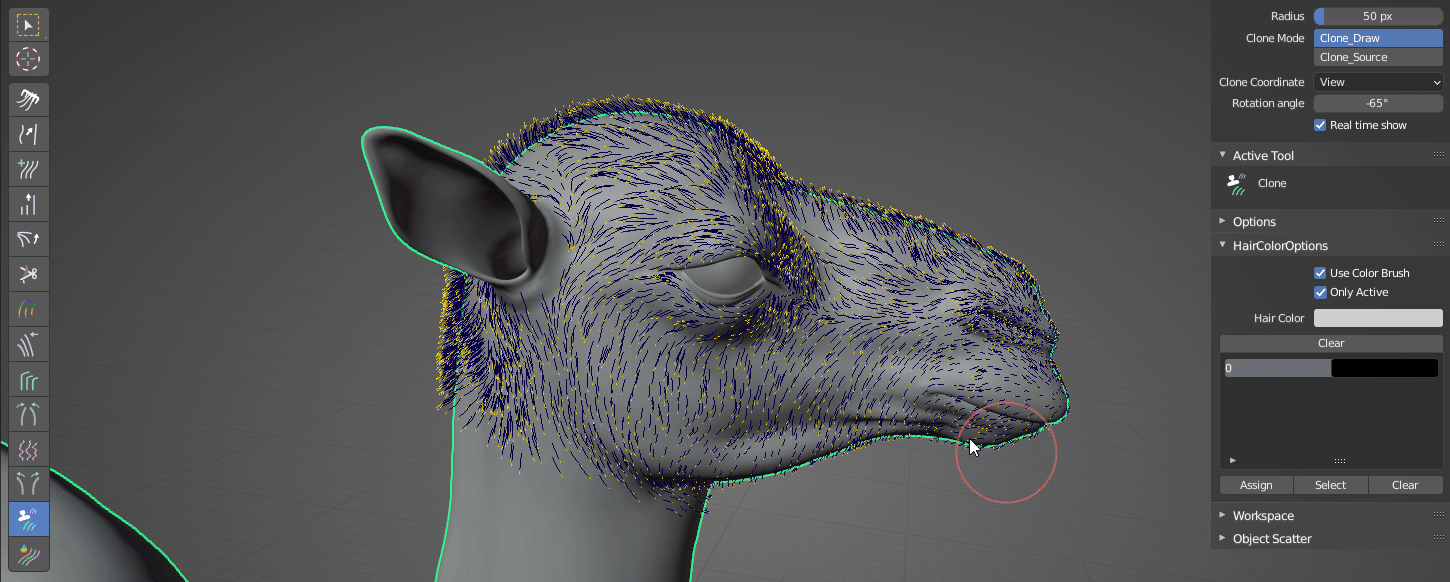
- Clone Brush
Clone Source: Pick the source of the guides to be cloned.
Clone Draw: Clone the guides at the position where this brush stays.
Rotation angle: The rotation angle of the clone brush which can also be achieved with shortcut—CTRL + MOUSE WHEEL
Note:
It only works with Use 3D Brush enabled.
It works only when the transforms, including location, rotation, and scale, are applied.
It works only when location and rotation are both set to 0, and scale is set to 1 in Delta Transform.
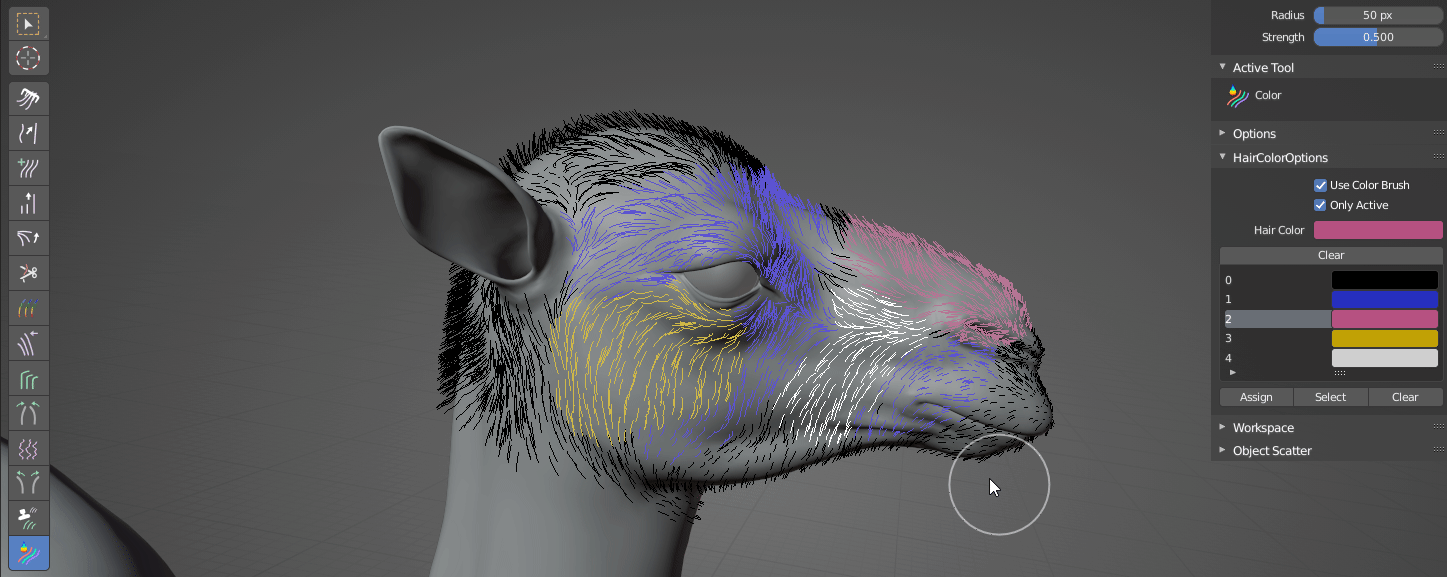
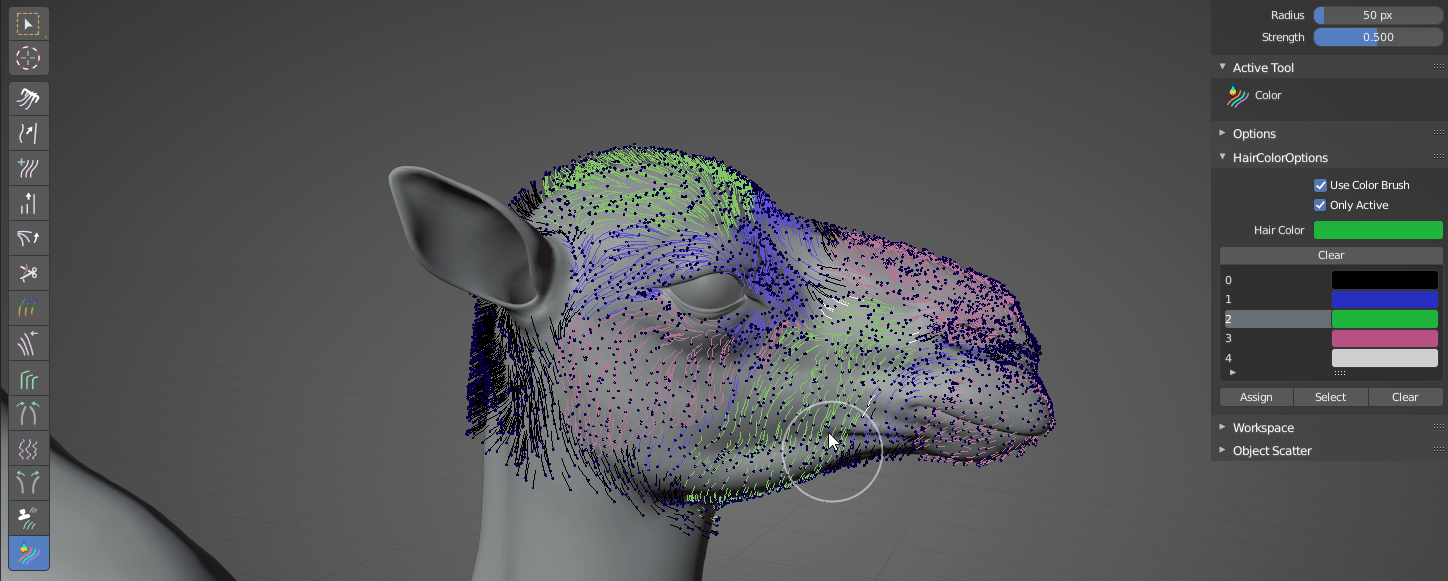
- Color Brush:
Group the guides by different colors.
The color groups can be edited.
Only Active: When enabled, only the colors of the active particle system will be displayed; when disabled, the colors of all the particle systems will be displayed.
Use Color Brush: Enable/Disable the colors.
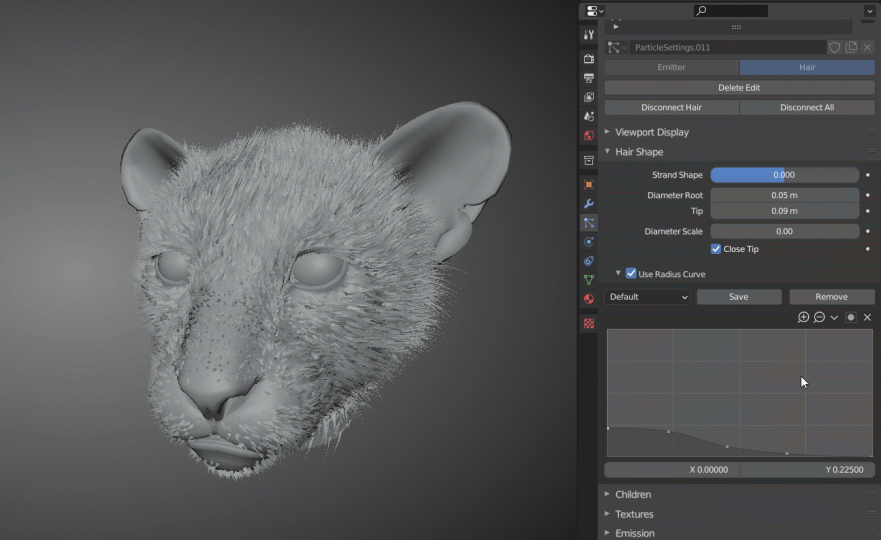
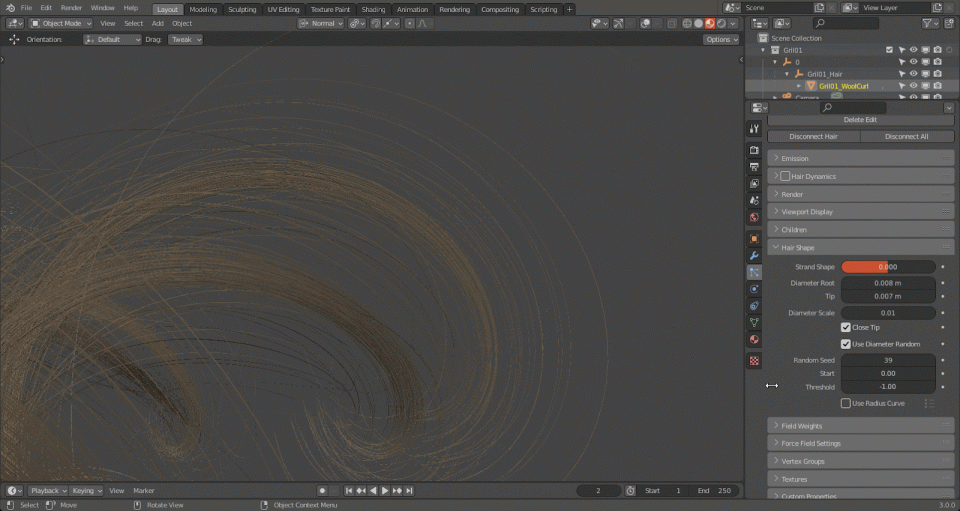
- Use Radius Curve: Control the shape of the guides with the curve.
PIEMENU
- Hot Key
- Hit V to display the pie menu of brushes.
- Hit J to display parameter menus.
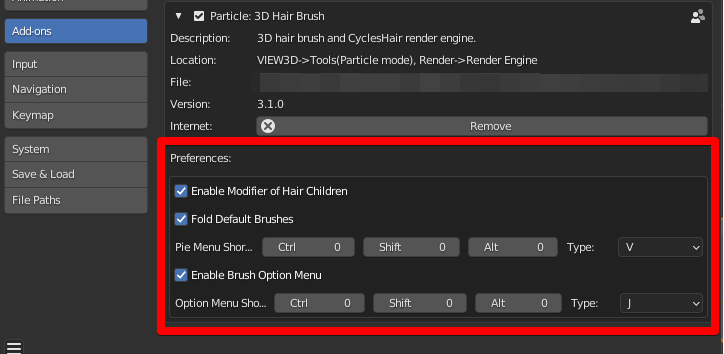
- Usage of Pie Menu
- Customize Pie Menu
Use Radius Curve (Only Windows is supported)
The following steps are required before using it.
- Switch the Render Engine to CyclesHair.
- Set the Hair Shape Type to Strip, and Additional Subdiv is optional under the Hair tab.
- Enable Use Radius Curve under the Hair Shape tab.
- Set the viewport shading to Material Preview Mode or Render Preview.
- Now, the shape of the guides are completely controlled by the curve. Curve settings can be saved as presets for later use at any time.
Note:
- In the CyclesHair render engine, Material Mode is just for displaying the thickness of hair.
- Strand Steps under the Viewport Display tab can be raised up somewhat if a high subdivision is required.
- At least one 3D viewport is required during rendering, or this function won’t work normally.
- When the render engine is switched to CyclesHair, the Cycles renderer is still used.
- When Use Radius Curve is enabled, adjusting parameters by dragging may cause display lag. Adjust the parameter again to fix it.
Use Diameter Random
It takes care of setting random thickness for the hair in one particle system.
Enable it, there are 3 additional parameters.
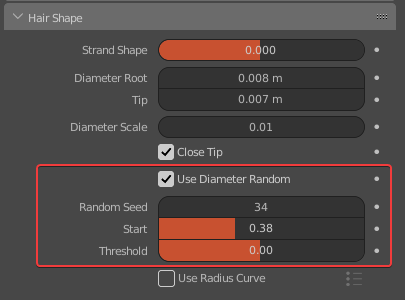
Random Seed:
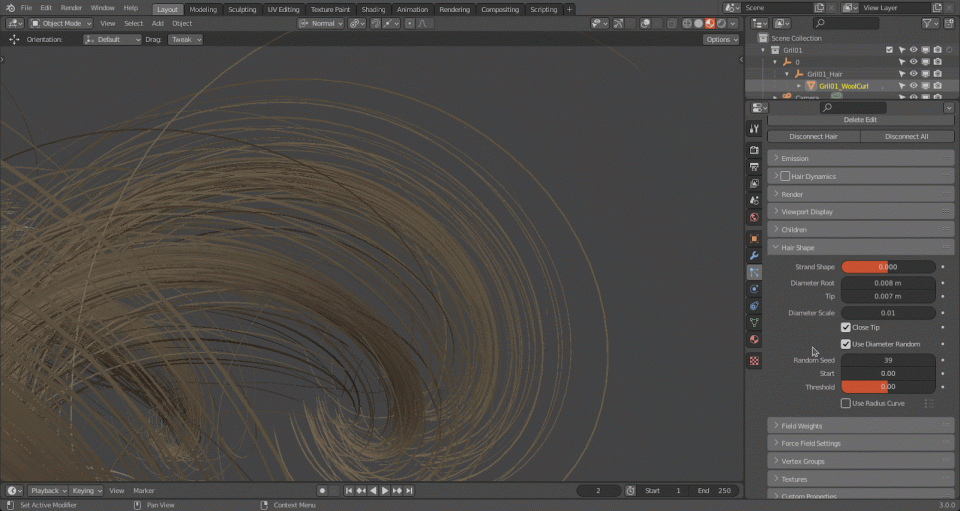
Threshold: It ranges from -1 to 1, determining the amount of hair that is affected by Use Diameter Random. When it’s set to 0, all hair will be of random thickness, that is, all will be affected.
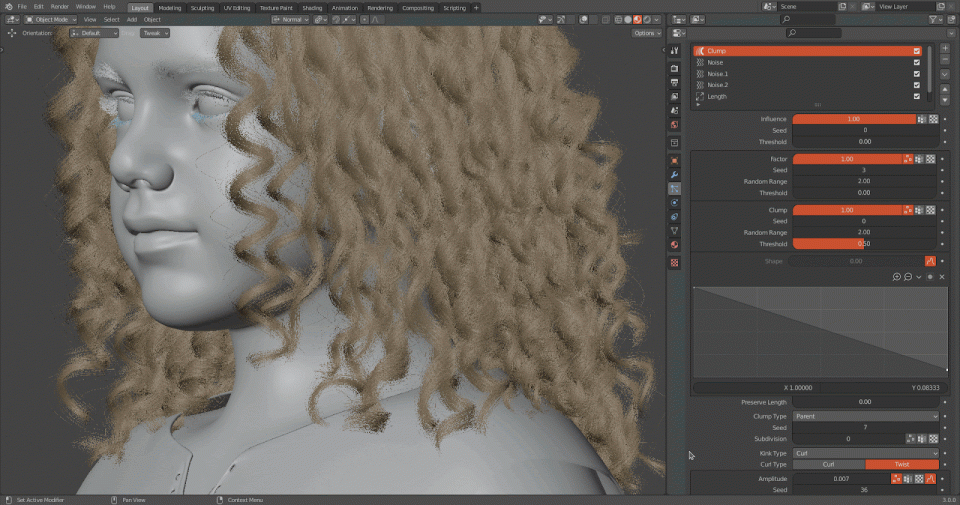
Modifier
Modifier is Children based. And there are 3 common modifiers—Length, Clump, and Noise.
Note: Please use the ABC Export (File -> Export -> Alembic HairModifier(.abc) ) when the works created by the Modifier need to be exported.
- Every modifier comes with these 3 parameters which are used to control:
- Influence: It determines the influence degree of this modifier.
- Seed: Random Seed, tweek it to find out a good result.
- Threshold: It controls the amount of hair that is affected by this modifier. The larger it is, the more the hair not affected by the current modifier will be.
- When the Seed and the Threshold in a modifier are the same as in another modifier respectively, both modifiers will take effect on the same hairs.
- There are 2 Threshold parameters in Clump modifier: one controls clumping, the other controls kink effect.
- There is Random by the side of many parameters. Enable it, there are 3 additional parameters below:
- Seed: Random seed. We can modify it to randomize the effect of the current parameter.
- Random Range: It controls the range of Random. Manual typing is required when it is greater than 1. The largest value is limited by each parameter itself. There is no effect when it’s 0.
- Threshold: It controls how much hair is randomized. When it’s set to 1, there is no random effect.
- Vertex Group & Texture
- Vertex Group: Assign a vertex group as the mask where the current parameter works, the usage is the same as the default function.
- Texture: Set a Texture as the mask where the current parameter works.
Note: To ensure the accuracy of it, the texture needs to be in the Non-color color space, like Raw. Besides, unwrapped UV is required.
- Length Modifier: used to modify the length of hair。
- Mode: Scale, scale up/down hair without hair shape change; Cut, cut hair off somewhat.
- Scale: determine the scale
- Cut: determine the length of hair after cutting.
Note: the steps of hair won’t be reduced.
- Noise Modifier: basically the same as Roughness.
- Seed: Random seed of the noise.
- Size: The size of the noise.
- Magnitude: The magnitude of the noise. It can be controlled by a curve.
Tip: The Magnitude is gradually getting larger from 0 to 1 from roots to tips.
- Threshold: It controls the amount of hair affected by the Noise modifier, which is the same as the Threshold under Roughness.
- Preserve Length: Preserve the original length, to avoid being stretched.
- Clump Modifier
- Options:
- Factor: It controls how much the clumping is. When reaching 0, there is no clumping, but with Kink effect.
- Clump: it’s basically the same as the default parameter. Yet, there are some differences. No matter how much it is, the roots won’t be affected.
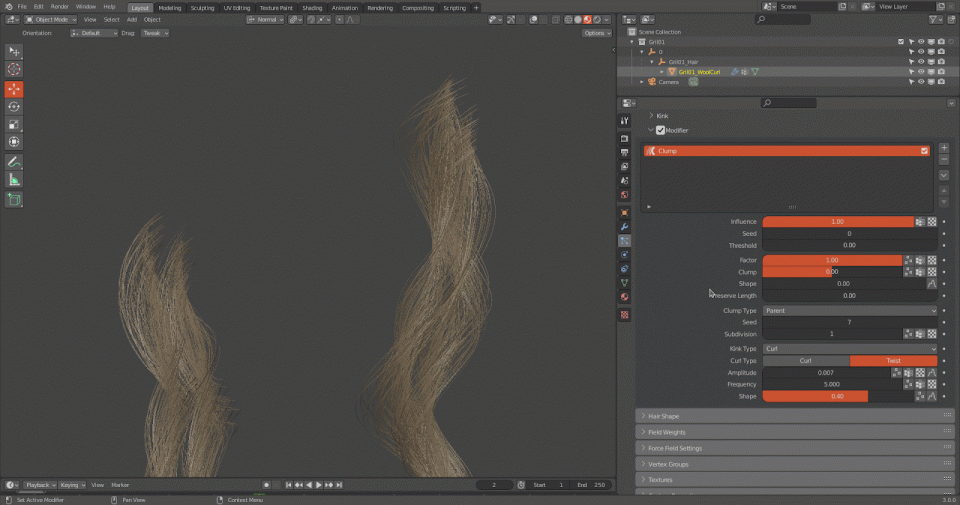
- Shape: It’s the same as the default parameter.
Tip: It can be controlled by a curve. When the curve is disabled, it’s linearly getting larger from 0 to 1 from roots to tips.
- Preserve Length: Preserve the original length, to avoid being stretched.
- Clump Type
- Parent: Clumps are generated according to the guides. Blender can run faster in this mode when a large amount of clumps are required.
- Subdivision: Split the clumps into multiple parts.
- Parent: Clumps are generated according to the guides. Blender can run faster in this mode when a large amount of clumps are required.
Note: The integer is needed.
- Generated: Clumps can be generated randomly on the surface, and the amount is controllable without any influence of parent clumps. If you want to attract some clumps which have different parents, this type can help. Blender may run slower in this mode, and it’s recommended to use this type when only a few clumps are needed.
- Seed: Random seed.
- Randomness: The randomness of clump distribution.
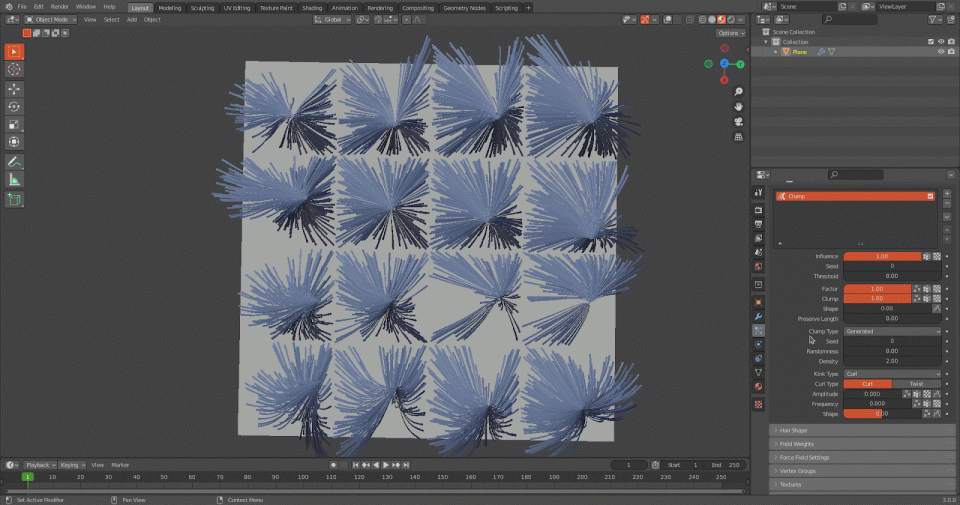
Density: The larger it is, the more but finer the clumps will be.
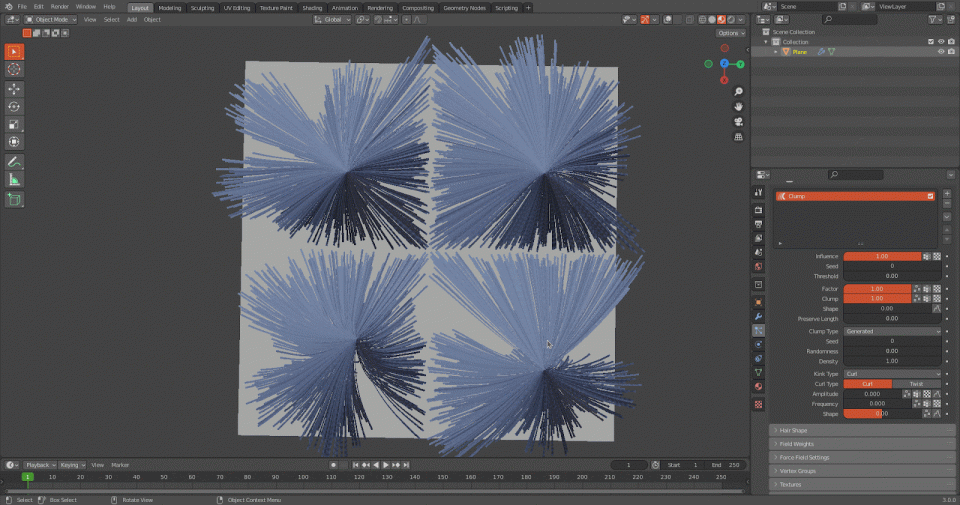
- Kink: Basically the same as in Blender.
- Kink Type: Curl, Radial, Wave, and Braid.
- Curl: There are 2 types available.
- Amplitude: The amplitude of the offset, which can be controlled by a curve.
- Orient: An additional option under Wave that controls the orientation of the wave and randomizes the orientation of the wave.
- Frequency: Same as the default parameter.
- Shape: Same as the default parameter in Blender, and can be controlled by a curve.
Full version
This version has all features, and will be a long-term maintained version.
Quantity:
Free viewer
This version can render or view the effects created with the Full version. It cannot modify any parameter or setting.
Quantity:

Fusion Script | Archive Engineering
Introduction: This script is mainly used for project packaging and search for missing footages with one-click, which greatly improves the user's work efficiency. In addition, users can cust...
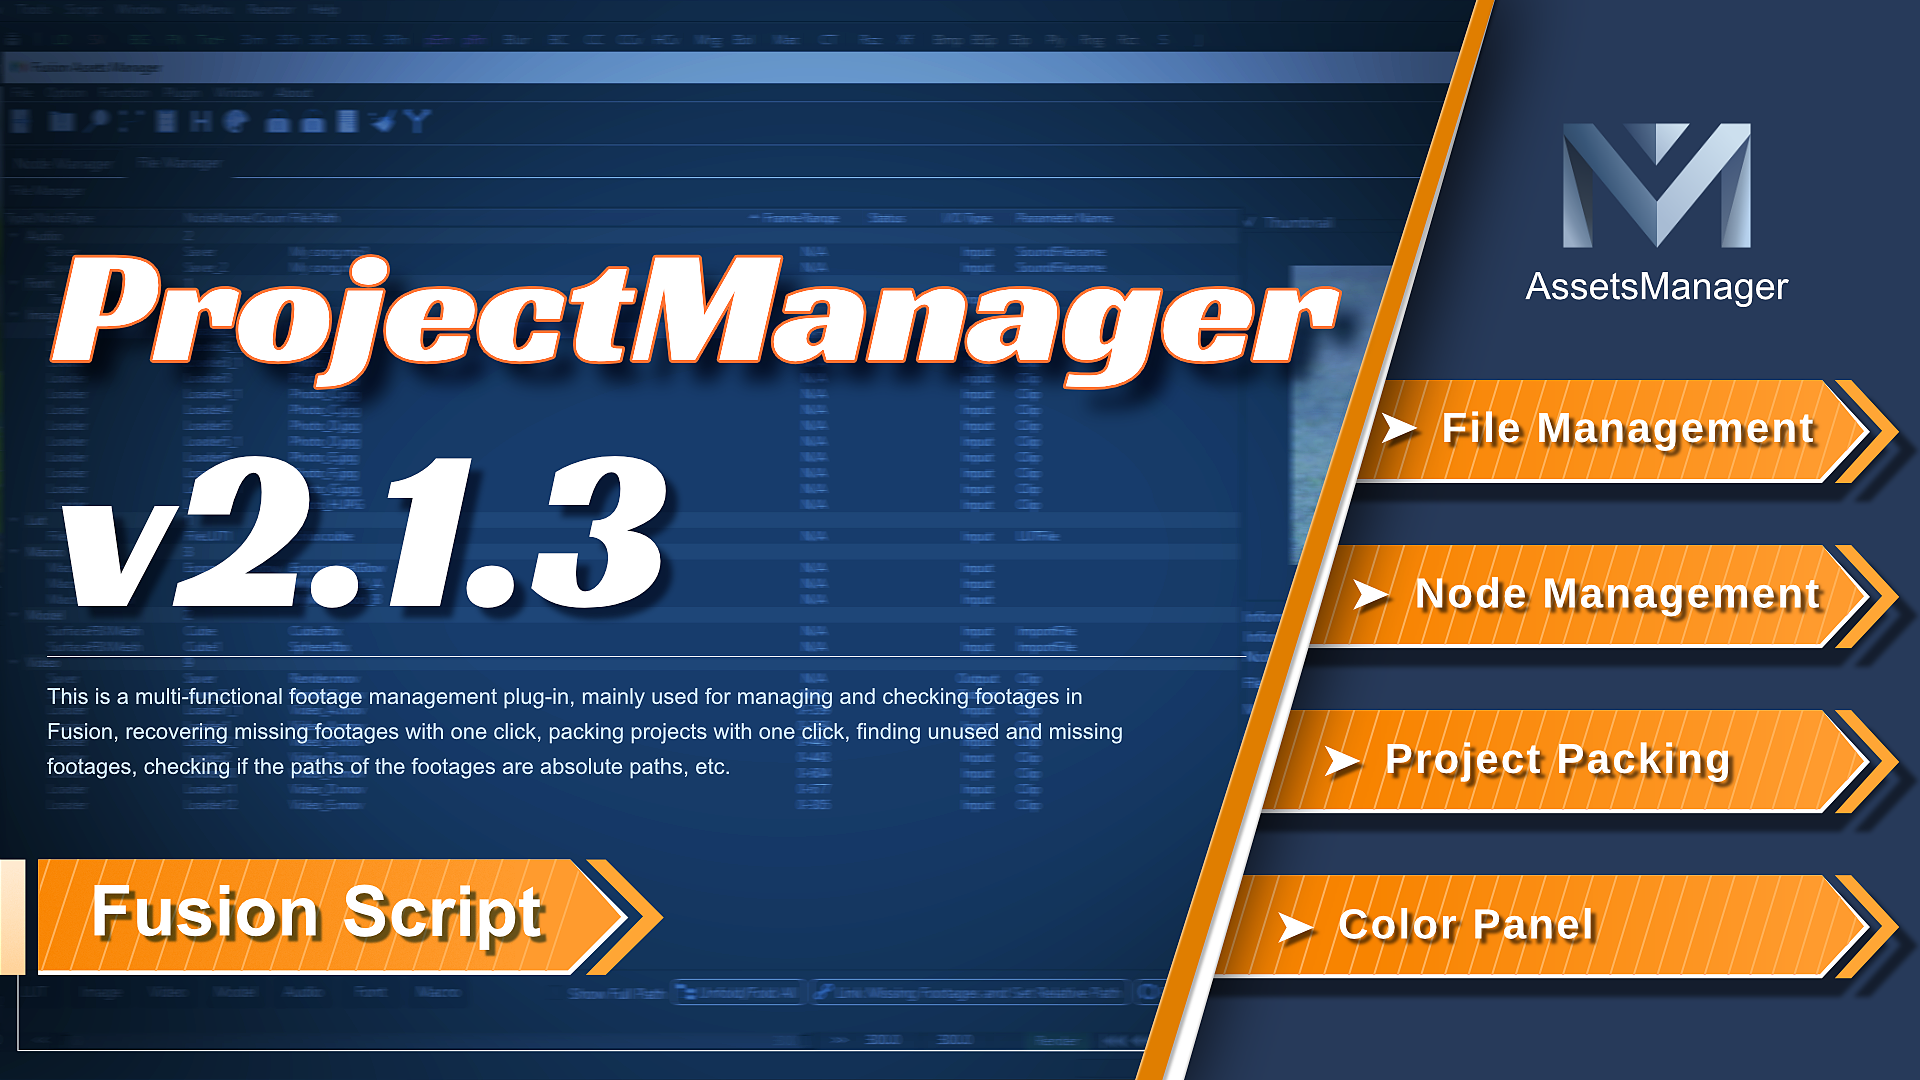
Fusion Script | ProjectManager
Introduction: This is a multi-functional footage management script, mainly used for managing and checking footages in Fusion, recovering missing footages with one click, packing projects with one c...
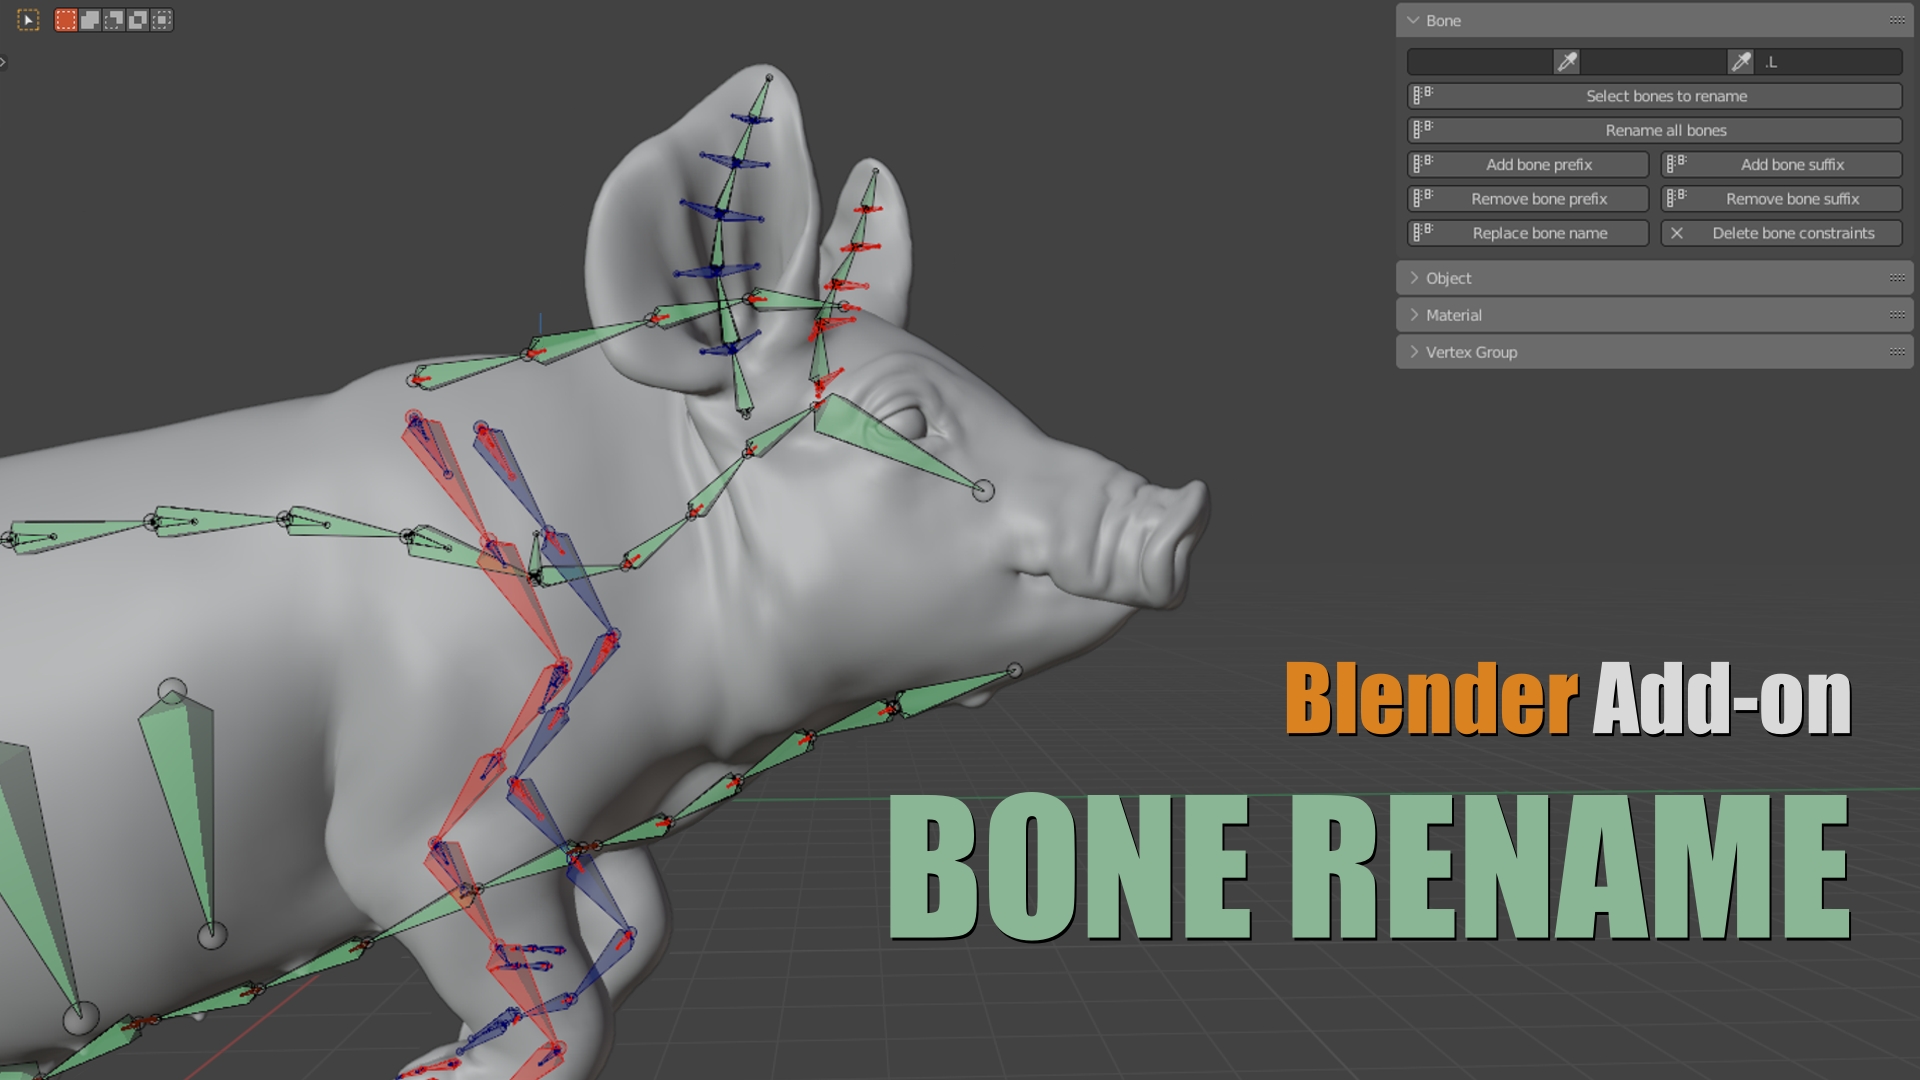
Blender Addon | Bone Rename
Introduction Bone_Rename is a smart batch rename tool. It can batch rename bones, objects, materials, and vertex groups, etc., such as modifying prefixes and suffixes, replacing specified characters ...
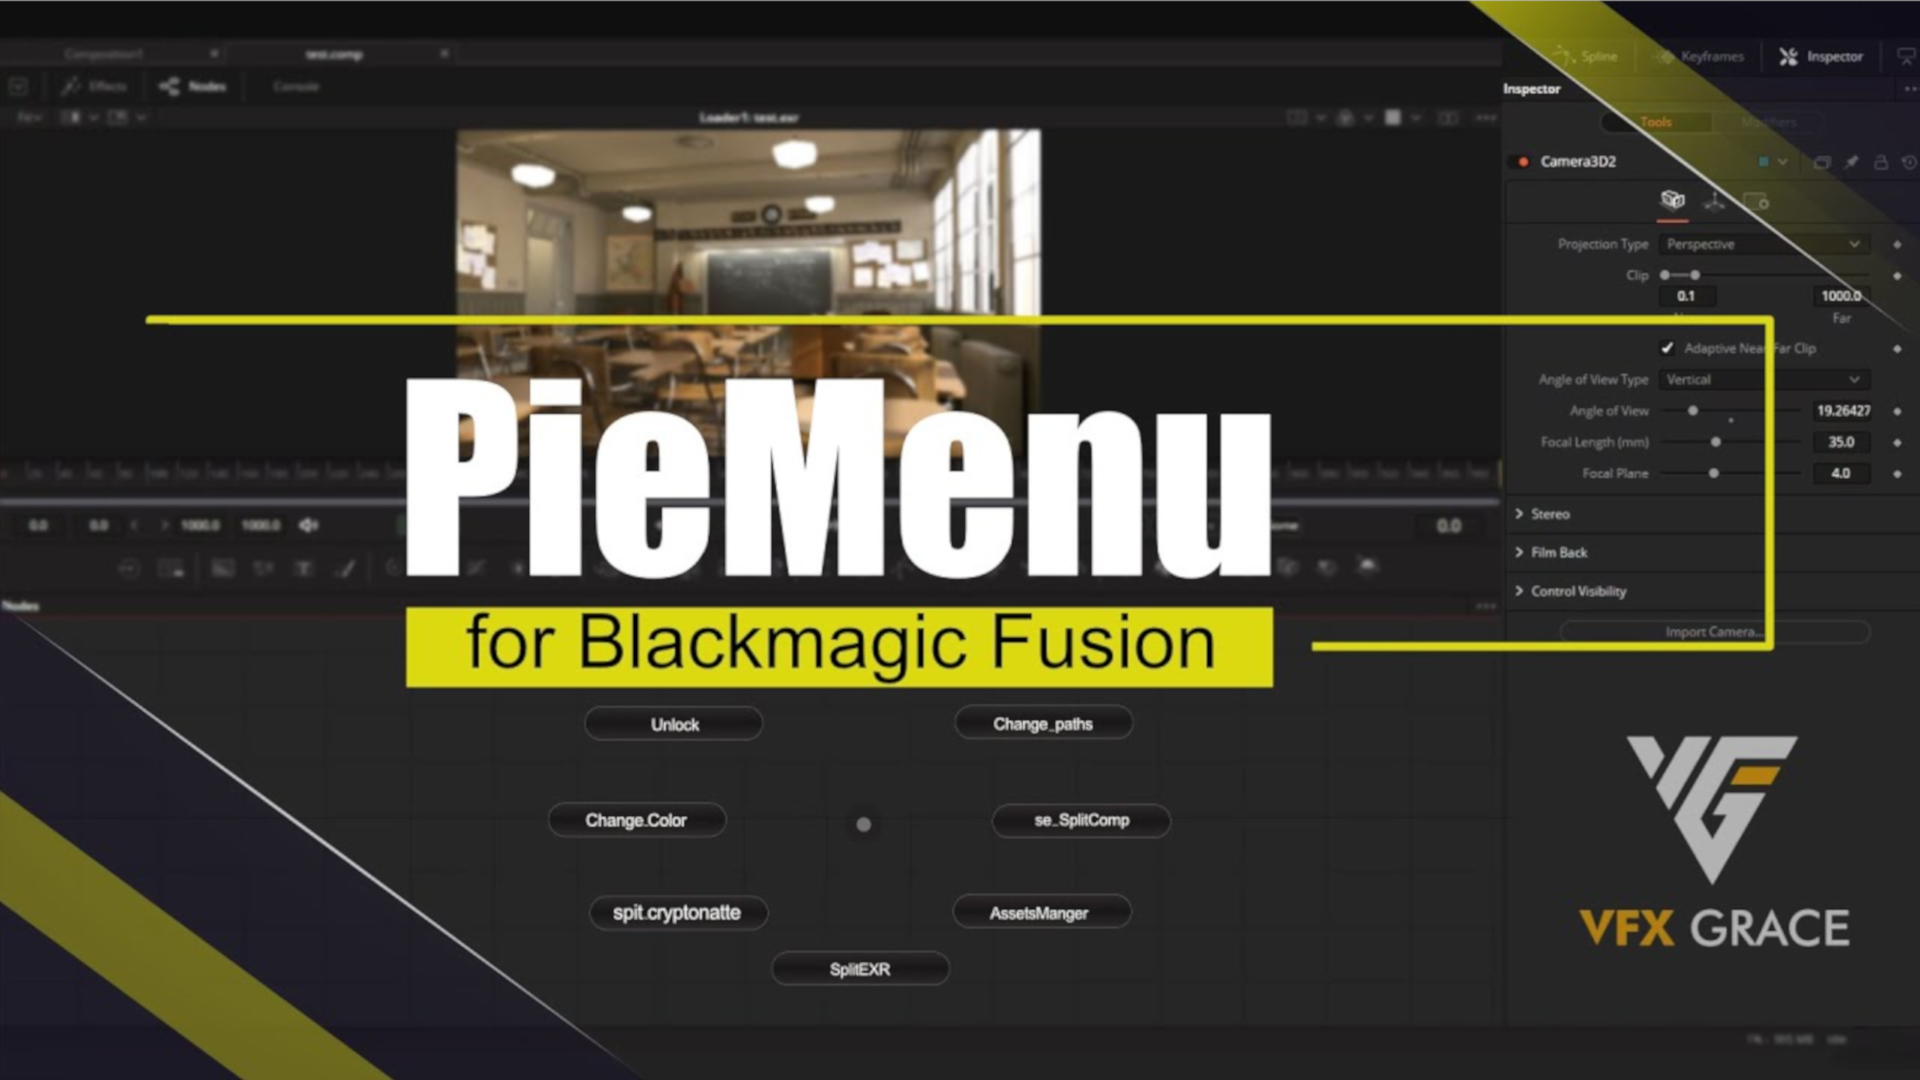
Fusion Script | PieMenu Editor
Hi, guys! PieMenu is similar to the PieMenus in blender, which has a unique pie menu function. You can add some common nodes or scripts in Fusion to the Pie Menu and you can also use it to replace t...
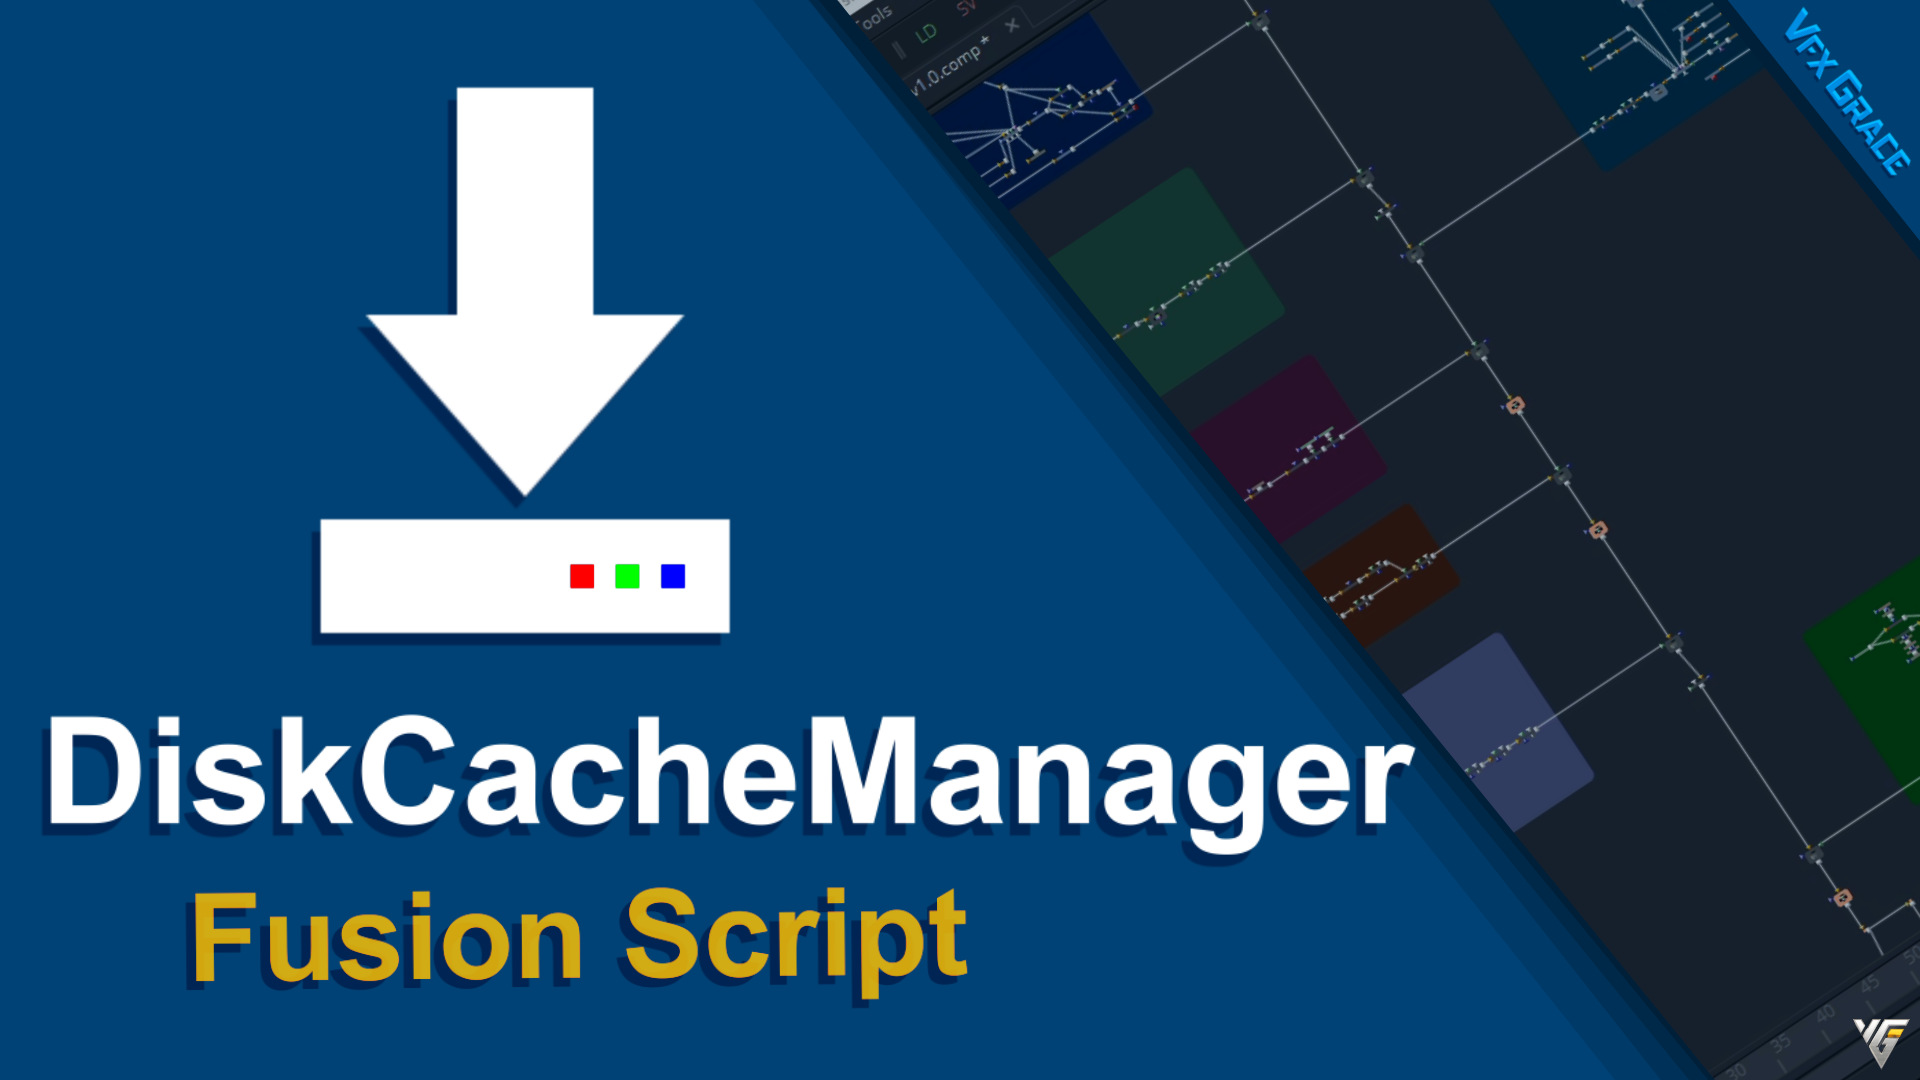
Fusion Script | DiskCacheManager
This is a script for efficient management of the Fusion node cache. It can centrally view and manage the cache nodes that are enabled in the project, such as enabling and disabling caches; locking c...

Reviews
There are no reviews yet.
Only logged in customers who have purchased this product may leave a review.