【Review】Blender3.3 Curves Hair VS Blender3.2 Particle Hair
I. Overview
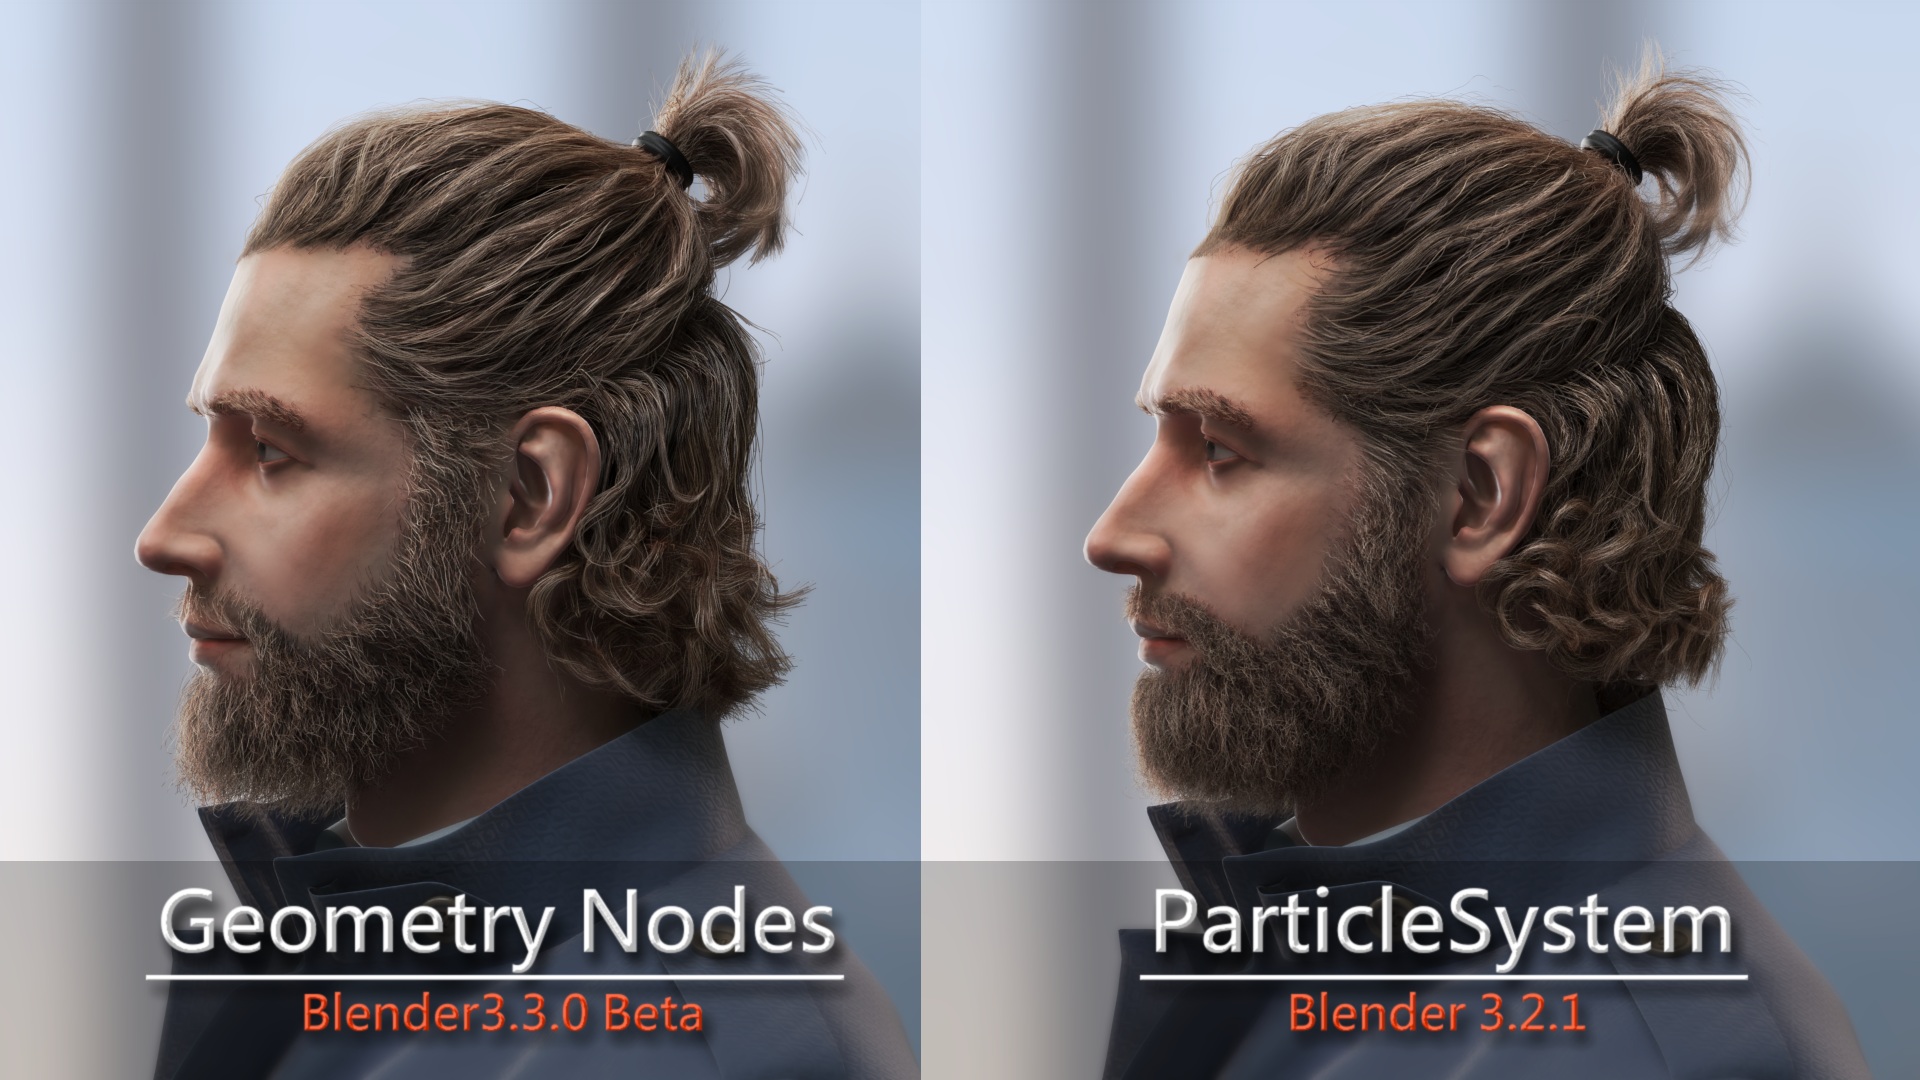
With the launch of Blender's new highlight—geometry node-based curves hair system, the heat and attention has been on high. The geometry node and new flexible brushes really made me excited, but the only factor that makes me hesitate is the integrity of the system, which brings me a bit confusion that whether it could adapt to our CG workflow. For this reason I used Blender particle hair and the new hair system to produce the same effect, and compare them from the efficiency, quality and other aspects.
Honestly, it's the first time for me to finish an effect with the new curves hair system. So here I'm going to go through the entire process to let you know whether the new hair system supports my workflow, and what we need to adapt if we go into this workflow. I believe it's the same confusion for you. So, hopefully, this review is helpful for you guys.
Anyway, any suggestions are welcome if you have different view.
II. Comparison Test
I will compare with the 2 hair systems from Grooming and Styling.
A. Grooming
1. Display Mode
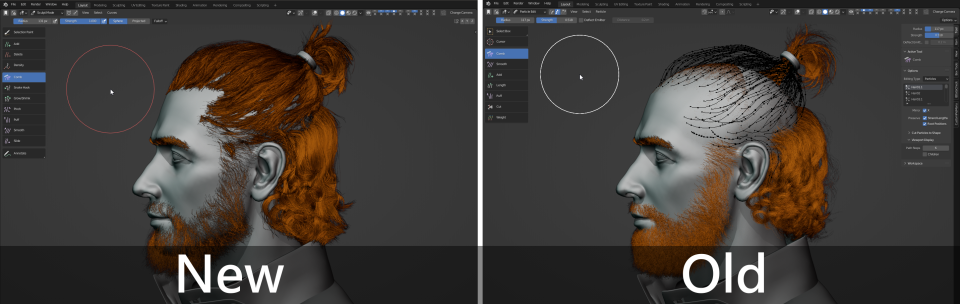
(1) The 'Sculpt Mode' of the new hair system abandoned the traditional way of guide line display, which brings us a more intuitive hairstyle result, so that we can easily get the thickness and styling of hair. I think it's so cool coz it implies that what we are checking is what we will get. Also, we are allowed to specify whatever colors we want by specifying a material. So compared with the new hair system, the particle hair system is not that intentive and much work to check final result. Before we can check 'Children Display', but it will slow down our work efficiency though, expecially the situation when there are too large amount of hairs.
2. Density Control
(1) Compared with the particle hair system, the new hair system got rid of planting hairs by vertex group and texture control range, instead, it updated "Add" and "Density" and "Delete" three brushes, which are used to add hair, control hair density and delete hair respectively. This way of hair generation brings us a better and easier control on distribution and density. So in the beginning of hair creation, we have to manually plant guide lines to an appropriate area, which may increase the workload somewhat. So there is advantage and disadvantage. What's your opinion?
3. Comb Brushes
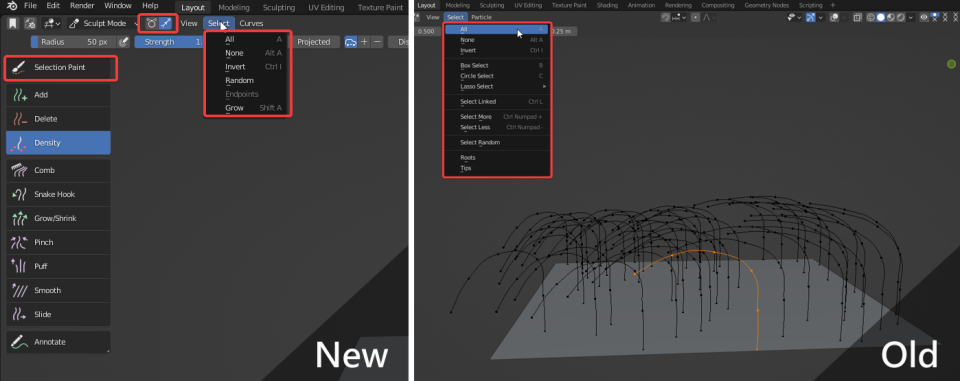
(1) In the new hair system, there are brush presets, including Comb, SnakeHook, Grow/Shrink, Pinch, Puff, Smooth, Slide, in which, SnakeHook, Pinch and Slide are the highlights. SnakeHook is used to drag the hair to the right length; Pinch is for hair aggregation; Slide makes it possible to let us move the hair along a surface at will with the hairstyle being preserved.
(2) And based on the original funtions, Smooth is kind of different from the previous one, which is, the previous Smooth brushe targets a straight line, yet the one in new hair system preserves the general direction of hair, and only smooth the details. Grow/Shrink is the combination of the previous Length and Cut, more convenient.
4. Accessibility
Undoubtedly, the brushes on the new hair system are a major highlight. Mabye in some auxiliary functions on the new hair system can be a little better. And when I dive into it, I found there are some more update: the brush operation feel and Selection mode. Let's go into details.
(1) For the particle hair system, there are three selection modes: Path, Point, Tip. In Path mode, we usually comb the general direction; In point mode, we can select the range that we need. Then the tip mode, only the tips can be effected, and the strength of the brush gradually decreases with the tips to the roots, until to 0 of strength. So in the tip mode, we can easily get a really smooth curve and a nice trend of hair.

For the new hair system, the comb mode is the same as the Path on the particle system when we just enter into scuplt Mode. And Point mode is in the menu 'Select'or we can use Selection Paint brush. But I failed to find the 'Tip' mode. So there may be a small challenge if you used to comb hair trend in Tip mode. Anyway, it just takes time to get familiar with the new things. But for Yeti ot Zbrush users, it's easier for them to transition to the new hair system.
(2) In terms of the selection of the new hair system, there are 2 parts: one is the Select in the menu bar, and the other one is the Selection Point brush. Sadly, I found the selection in the new hair system is of low efficiency. In the particle hair system, in the Point mode, there are some handy selection ways: Tips, Roots, Select Random, Select More/Less, and we can quickly select the linked part using "L" key. Moreover, Box Select, Circle Select, and Lasso Select are on hand. These auxiliary functions can largely help us to improve efficiency when we use them skillfully.
As for the new hair system, it provides Tips and Roots of selection way, Selection Paint brush, as well as two selection modes—Control Point and Curves. In fact, after testing, I think it is not that convenient because I have to zoom in view very much if I want to handle a single hair carefully. Yet in the particle hair system, 'L' key can easily deal with it. But maybe this is only my matter and I need to spare some time to adapt it.
(3) In the new hair system, there is no Show/Hide guide lines like the particle hair system. And I really need the same function as 'Face Sets' in Sculpt mode of an object, so that I can handle the hairs by groups, and hide and show hairs by groups if supported. I think it will bring great help to our creation.

(4) Steps Setting: Typically, we start off with a rough hairstyle and then refine it gradually. So at the beginning, a small step is convenient for us to shape a general shape and then increase the steps to retouch the details. In the particle hair system, we simply Rekey the desired hair. Yet for the new hair system, of courses, we can do it through 'ResampleCurve' in the geometry node, but before that, we have to apply the modifie. So it's a bit more work in the new hair system when we refine hairstyle.
B. Styling
After the grooming part, let's dive into styling part. Here another major highlight is going to be involved, that is, Geometry Node.
(1) Particle Hair System
In the particle hair system, we mainly use some related parameters to add some hair details for a realistic hairstyle, such as Clumping, Kink in the Children tab, as well as many other parameters.
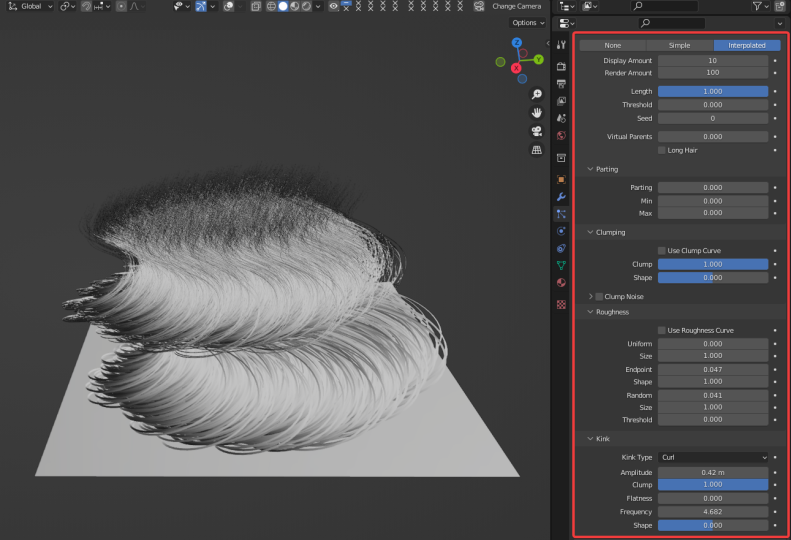
And we can easily get some hairstyles by simply adjusting those parameters. But in fact, our creation is kind of limited to the present parameters. So it's difficult to create complicated hairstyles using Particle System only, and indeed, there are few realistic works. I have to say, it's far limited. Luckily, there are some powerful add-ons that help a lot to get a really nice result. You may search for them on the BlenderMarket if interested.
(2) New Hair System
a. The new hair system is much more powerful than particle system due to the geometry node, easily achieving effects that cannot be done by particle hair system only. The most exciting thing is that any effect can be stacked, such as random stack. This way, in addition to being random overall, every single hair can be also in the random shape.
b. The modifiers that control styling can be applied, then it implies that we are allowed to comb the hairstyle destructively after hair styling, which greatly improves the controllability of the hair styling and makes it possible to get rid of the present parameters, and offers users a large space to create their own works freely, even adjust every single hair. Obviously, particle hair system is completely limited by the present parameters.
c. Though there is not a complete hair preset of Geometry node released by Blender official platform, it's not a big deal, actually you will find some released by some seasoned Blender users if you search online. Anyway, hair styling based on gemetry nodes is really handy and flexible.
III. Workflow
After the above introduction, I believe you have learned a bit about the difference between the two hair systems. So let's go back to my question: whether the new hair system is up to my current workflow? Currently, the new particle systems still cannot perfectly support the two important links—texture and dynamics. Please kindly share with me the solutions to the problems listed below if possible, really appreciate it.
a. Textures. Textures may not be used heavily in the production of human hair, but I still kind of want to make the hair color somewhat randomized by noisy textures to get more realism. Currently, noise just works on single hair well, yet failed to recognize the UV of the object thus to achieve color changes overall. Similarly, the new hair system is unable to recognize any texture that we draw, which makes it impossible for me to use it to produce animal fur.💔
b. Animation: Bone rigging is essential in my workflow of animals and characters, yet the new hair system does not support bone rigging for now. That is to say, I only can make still characters.
c. Hair dynamics, which has been discussed for a long time, is not supported in the new hair system. For me, lots of my work involves simulation of hair dynamics, which is also essential.
IV. Summary.
Briefly, I was surprised by the flexibility and the controllability of the new hair system, but the lack of animation and hair dynamics simulation prevents me from using the new hair system to create projects for now, really feel bad for this. 😔
Besides, there are still many bugs. For example, some newly-added hair added by Add and Density brush cannot be rendered properly; Blender sometimes crash due to unknown errors. I believe Blender development team is fixing these issues.
Anyway, really exciting to finally see a nice new hair system coming to Blender. 😊

Your posts always provide me with a new perspective and encourage me to look at things differently Thank you for broadening my horizons
Your posts always provide me with a new perspective and encourage me to look at things differently Thank you for broadening my horizons
Usually I do not read article on blogs however I would like to say that this writeup very compelled me to take a look at and do so Your writing taste has been amazed me Thanks quite nice post
Hello! Since this article was only tested during the initial release of the new hair system, using Blender 3.3 as the testing version, there may indeed be discrepancies based on the current perspective. Nevertheless, I appreciate your patient reading and suggestions.
Hey, cool article and some amazing content on this site!
After I went trough a production character with the new system – (for stills only for now, but blender foundation are working on the simulation for future releases), I think some of the points will need revising since the 3.5.1 the new presets and also regarding the density control with textures or vertex groups weights.
Also regarding the uvs for the curves coloring, you can use Input -> Curve Info node to control by length or per curve, or Attribute – surface_uv_coordinate attrib to use as UV and be able access the uvs and slap any texture you like for the hair.
As for groups, the way I group different parts of the character is by just making a few hair curve objects. I create one for the front of the face, one for the other parts of the head, body etc. This way you can still work on separate areas, hide and show others, or as I my workflow, I use only guides and then use the interpolate hair node to make the hair dense (quite similar to houdini or I guess the particle hair).
Cheers,
Martin
nice,Maybe this article will have more attention on YouTube
Yes, thank you for your advice.